Set/Resume Switch Test/Replacement
- Disconnect the battery negative cable, then disconnect the positive cable, and wait at least three minutes.
- Disconnect the driver's airbag connector (see DRIVER'S AIRBAG ASSEMBLY
).
- Remove the dashboard driver's lower cover (see DASHBOARD COMPONENT REMOVAL/INSTALLATION
).
- Disconnect the cable reel sub-harness 3P connector from the main wire harness.
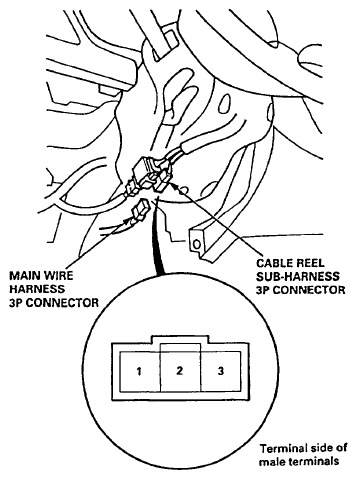 Courtesy of AMERICAN HONDA MOTOR CO., INC.
- Check for continuity between the terminals of the cable reel sub-harness 3P connector in each switch position according to the table.
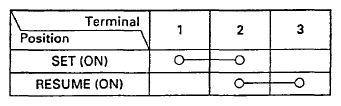 Courtesy of AMERICAN HONDA MOTOR CO., INC.
- If there is continuity, and it matches the table, the switch is OK.
- If there is no continuity in one or both positions, go to step 6.
- Remove the two screws, then remove the switch.
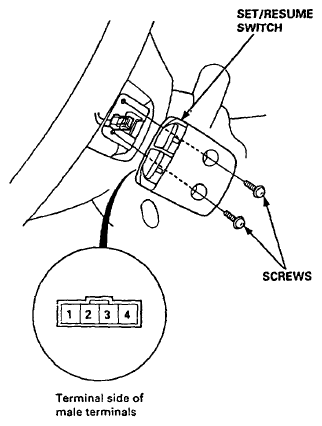 Courtesy of AMERICAN HONDA MOTOR CO., INC.
- Check for continuity between the terminals in switch position according to the table.
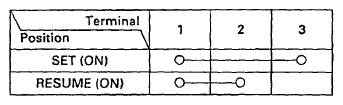 Courtesy of AMERICAN HONDA MOTOR CO., INC.
- If there is continuity, and it matches the table, replace the cable reel.
- If there is no continuity in one or both positions, replace the switch.
- If all tests prove OK, reconnect the cable reel and cable reel sub-harness connector, then reinstall the steering column covers.
- Reconnect the driver's airbag connector, and reinstall the access panel on the steering wheel.
- Reconnect the battery positive cable, then the negative cable.
- After connecting the airbag connectors, confirm proper system operation: Turn the ignition switch ON (II); the SRS indicator light should come on for about six seconds and then go off.