Fuel Pump/Fuel Gauge Sending Unit Replacement
- Relieve the fuel pressure (see FUEL PRESSURE RELIEVING
).
- Remove the fuel cap.
- Remove the rear seat cushion (see
REAR SEAT REMOVAL/INSTALLATION
).
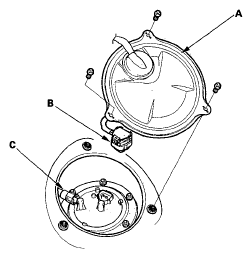
- Remove the access panel (A) from the left side of the floor.
 Courtesy of AMERICAN HONDA MOTOR CO., INC.
- Disconnect the fuel pump 5P connector (B).
- Disconnect the quick-connect fitting (C) from the fuel tank unit.
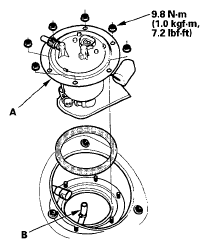
- Remove the fuel tank unit (A), and disconnect the transfer tube (B).
 Courtesy of AMERICAN HONDA MOTOR CO., INC.
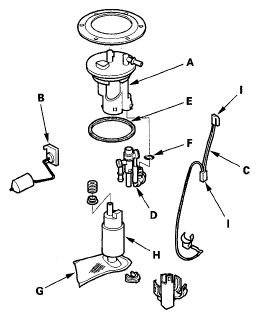
- Remove the strainer case (A), the fuel gauge sending unit (B), the wire harness (C), and the fuel pressure regulator (D).
 Courtesy of AMERICAN HONDA MOTOR CO., INC.
- Install the parts in the reverse order of removal with a new base gasket (E) and a new O-ring (F), then check these items:
- Make sure the connection is secure and the suction filter (G) is firmly connected to the fuel pump (H).
- Connect the transfer tube.
- When connecting the wire harness, make sure the connection is secure and the connectors (I) are firmly locked into place.
- When installing the fuel gauge sending unit, make sure the connection is secure and the connector is firmly locked into place. Be careful not to bend or twist it excessively.