2nd Clutch Transmission Fluid Pressure Switch Replacement
- Make sure you have the anti-theft codes for the audio system and the navigation system. Make sure the ignition switch is in LOCK (0).
- Remove the battery trim and left upper fender cover.
- Disconnect the negative terminal from the battery, then disconnect the positive terminal.
- Remove the battery hold-down bracket, and remove the battery and battery tray.
- Remove the air cleaner (see
AIR CLEANER REMOVAL/INSTALLATION
).
- Remove the bolts securing the under-hood fuse/relay box, and move the fuse/relay box.
- Disconnect the 2nd clutch transmission fluid pressure switch connector, and remove the 2nd clutch transmission fluid pressure switch (A).
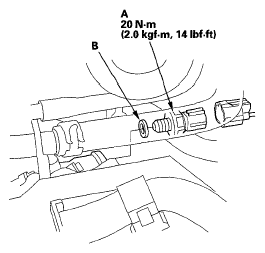 Courtesy of AMERICAN HONDA MOTOR CO., INC.
- Make sure there is no water, oil, dust, or foreign particles inside the connector.
- Install the new 2nd clutch transmission fluid pressure switch and a new sealing washer (B), and tighten the switch.
- Connect the connector securely.
- Install the air cleaner (see
AIR CLEANER REMOVAL/INSTALLATION
).
- Install the battery tray, battery, and battery hold-down bracket, then connect the battery terminals.
- Install the left upper fender cover and battery trim.
- Enter the anti-theft codes for the audio system and the navigation system.
- Do the steering column memorization (see
STEERING COLUMN POSITION MEMORIZATION
).
- Do the power window control unit reset procedure (see
RESETTING THE POWER WINDOW CONTROL UNIT
).