4th Clutch Transmission Fluid Pressure Switch Replacement
- Remove the battery trim and left upper fender cover.
- Remove the air cleaner (see
AIR CLEANER REMOVAL/INSTALLATION
).
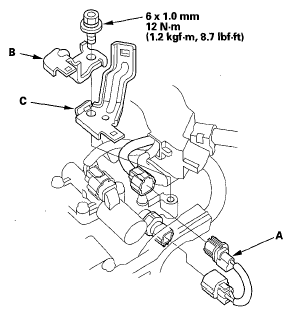
- Disconnect the 4th clutch transmission fluid pressure switch harness connectors (A).
 Courtesy of AMERICAN HONDA MOTOR CO., INC.
- Remove the bolt securing the connector bracket, and remove the connector bracket (B) and harness clamp bracket (C).
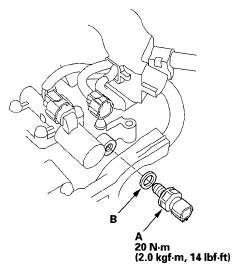
- Remove the 4th clutch transmission fluid pressure switch (A).
 Courtesy of AMERICAN HONDA MOTOR CO., INC.
- Make sure there is no water, oil, dust, or foreign particles inside the connector.
- Install the new 4th clutch transmission fluid pressure switch and a new sealing washer (B), and tighten the switch.
- Install the harness clamp bracket and connector bracket with the mounting bolt.
- Connect the connectors securely.
- Install the air cleaner (see
AIR CLEANER REMOVAL/INSTALLATION
).
- Install the left upper fender cover and battery trim.