Oil Pump Overhaul: Removal
- Remove the right upper fender trim, the battery trim, the left upper fender trim, the upper grille cover (see
UPPER GRILLE COVER REPLACEMENT
), and the cowl cover (see
COWL COVER REPLACEMENT
).
- Remove the under-hood fuse/relay box, the connector, and the transfer breather hose from the strut brace, then remove the strut brace (see step 16 under
ENGINE REMOVAL
).
- Remove the connector bracket from the front cylinder head; use the bracket bolt hole to attach the engine balance bar front arm (see step 53 under
ENGINE REMOVAL
).
- Remove the engine mount control solenoid valve bracket from the rear cylinder head; use the bracket bolt hole to attach the 2008 V6 attachment arm (see step 54 under
ENGINE REMOVAL
).
- Lift and support the engine with the engine support hanger and engine balance bar. Attach the front arm to the front cylinder head with a spacer and the 10 x 1.25 mm bolt. Remove the rear arm from the balance bar, and install the 2008 V6 attachment arm, then attach the 2008 V6 attachment arm to the rear cylinder head with the 8 x 1.25 mm bolt (see step 55 under
ENGINE REMOVAL
).
- Remove the timing belt (see
TIMING BELT REMOVAL
).
- Remove the crankshaft position (CKP) sensor (see
CMP SENSOR REPLACEMENT
).
- Remove the rocker arm oil control solenoid/oil filter assembly (see step 9 under
CRANKSHAFT AND PISTON REMOVAL
).
- Remove the oil pan (see
OIL PAN REMOVAL
).
- Remove the oil screen (A), then remove the oil pump (B).
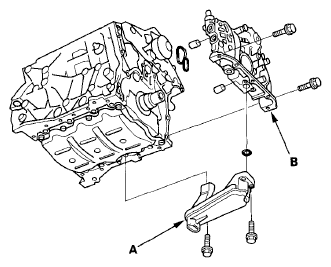 Courtesy of AMERICAN HONDA MOTOR CO., INC.