SRS Unit Replacement: Installation
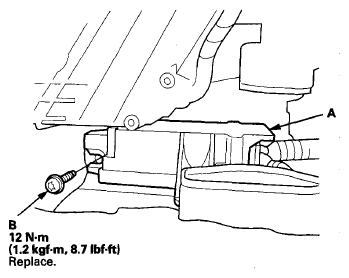
- Install the SRS unit (A) with the new TORX bolt (B) using a TORX T30 bit.
 Courtesy of AMERICAN HONDA MOTOR CO., INC.
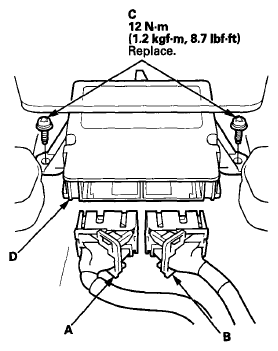
- Install the new TORX bolts (C) using a TORX T30 bit.
 Courtesy of AMERICAN HONDA MOTOR CO., INC.
- Connect the SRS connectors A (39P) and B (39P) to the SRS unit (D); push them into position until they click and the lever locks are fully secured (see LEVER-LOCKED CONNECTOR
).
- Tighten the three installed TORX bolt to the specified torque.
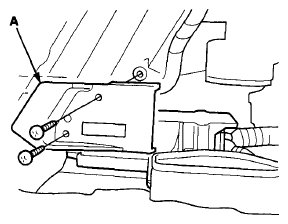
- Install the driver's side center console clip bracket (A) with the two screws.
 Courtesy of AMERICAN HONDA MOTOR CO., INC.
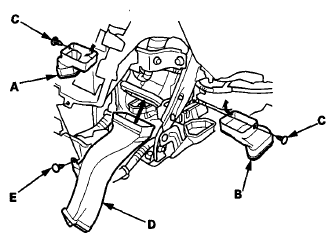
- Install the left and right heater joint ducts (A, B), then push the clips (C).
 Courtesy of AMERICAN HONDA MOTOR CO., INC.
- Install the center heater joint duct (D), then push the clips (E).
- Make sure the heater joint ducts are installed securely.
- Install the center console (see
CENTER CONSOLE REMOVAL/INSTALLATION
).
- Do the battery terminal reconnection procedure (see
BATTERY TERMINAL DISCONNECTION AND RECONNECTION
).
- Make sure the SRS unit has the latest software. If it does not have the latest, update the software in the SRS unit (see SRS UNIT UPDATE
).
- Do the ODS unit initialization (see ODS UNIT INITIALIZATION
).
- Check the operation of the ODS unit with the HDS (see ODS UNIT OPERATION CHECK
).
- Confirm proper SRS operation: Turn the ignition switch to ON (II), or press the engine start/stop button to select the ON mode, and check that the SRS indicator comes on for about 6 seconds and then goes off.