Proportioning Valve (Later Model Non-Abs)
- If left rear proportioning valve is suspect, disconnect tube nut fitting at master cylinder primary port (port closest to power brake booster). Install Adapter (8494-2) onto master cylinder.
- If right rear proportioning valve is suspect, disconnect tube nut fitting at master cylinder secondary port (port furthest from power brake booster). Install Adapter (8494-1) onto master cylinder.
- Connect primary brake tube to adapter. Install Pressure Gauge (C-4007-A) onto adaptor. Tighten all tube nut fitting to specification. See TORQUE SPECIFICATIONS
.
- Remove screw attaching speed control servo to upper radiator closure panel. Remove screw attaching washer filler tube to upper radiator closure panel. Remove nut and bolt securing transmission control module to vehicle. Lift transmission control module (with speed control servo attached) from its mount, leaving wiring harness attached. Move it off to side (toward engine), making sure not to strain wires and speed control servo cable.
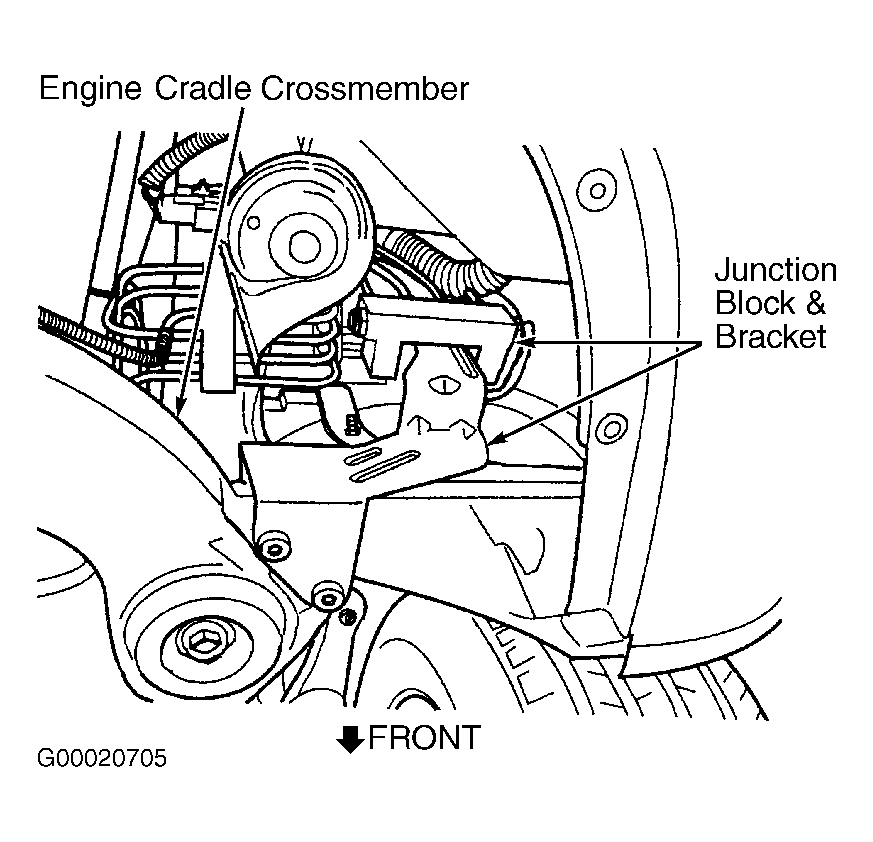
- Clean any debris away from fittings on top of junction block. Remove chassis brake tube leading to either left rear or right rear brake at junction block. See Fig 1
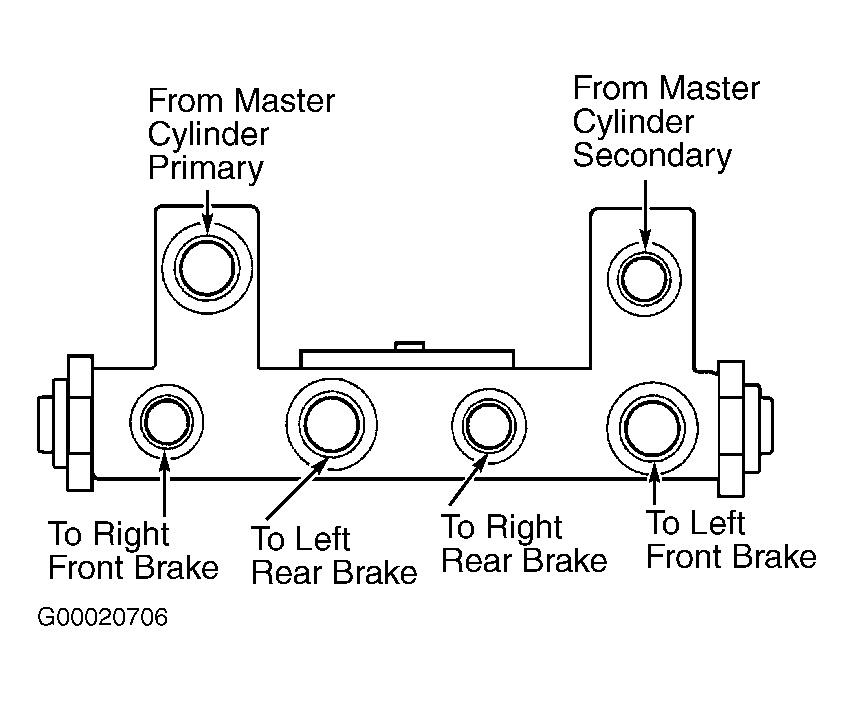
. If left rear proportioning valve is suspect, install Adapter (8494-3) onto junction block. If right rear proportioning valve is suspect, install Adapter (8494-4) onto junction block. See Fig 2
.
- Install Pressure Gauge (C-4007-A) onto adapter. Tighten all tube nut fitting to specification. Bleed system, including hose between pressure test fitting and pressure gauge.
- With an assistant, apply pressure to brake pedal until reading on proportioning valve inlet gauge (at master cylinder) is 1000 psi. Check pressure reading on proportioning valve outlet gauge (at junction block outlet to rear brake). If proportioning valve outlet pressure is not 525-625 psi, replace junction block (with internal proportioning valves). If pressure is within specification, goto next step.
- Remove pressure gauge and adapter from junction block. Reinstall chassis brake tube onto junction block port. Tighten tube nut fitting to specification. See TORQUE SPECIFICATIONS
.
- Install transmission control module (with speed control servo attached) in its normal position. Install corresponding nut and screw. Install transmission control module mounting nut and bolt securing it in place, and tighten to specification. See TORQUE SPECIFICATIONS
. Install screw attaching washer filler tube to upper radiator closure panel. Install screw attaching speed control servo to upper radiator closure panel.
- Remove pressure gauge and adapter from primary or secondary port of master cylinder. Install brake tube onto primary or secondary port of master cylinder, and tighten tube nut to specification. See TORQUE SPECIFICATIONS
. Bleed affected brake line. See BLEEDING BRAKE SYSTEM
. If no problem is found with proportioning valves, check rear wheel brake shoe linings for contamination, and ensure rear wheel brake shoes linings meet OEM material specifications.
 Courtesy of DAIMLERCHRYSLER CORP.
 Courtesy of DAIMLERCHRYSLER CORP.