Test A: Speed Control Is Inoperative
- Check For Power & Ground To Speed Control
Servo/Actuator
- Turn ignition off. Disconnect speed control
servo/actuator connector C177 (located on left front side of engine
compartment). Turn ignition switch to RUN position. Using a voltmeter,
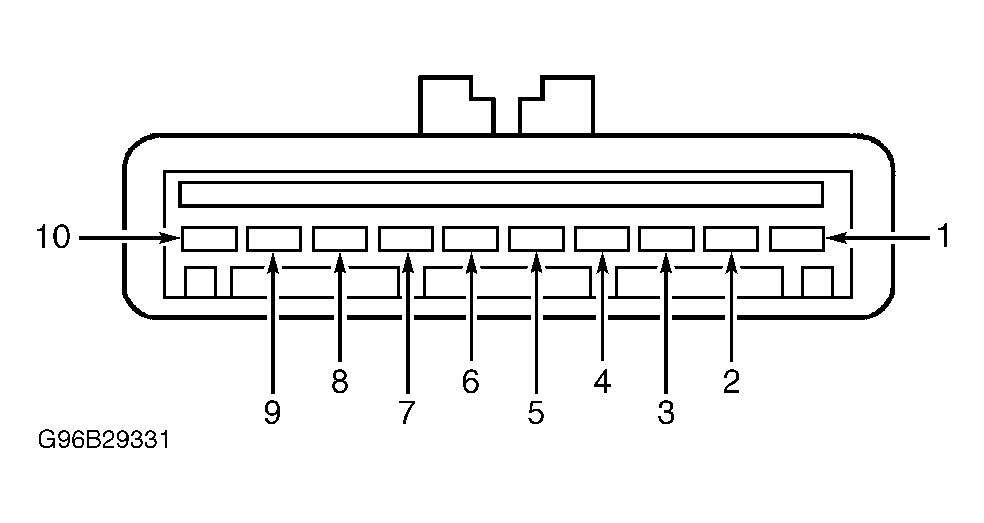
check voltage between speed control servo/actuator connector C177
terminals No. 7 and 10. See
Fig 1
. If voltage is more
than 10 volts, go to step 4). If voltage is 10 volts or less, go to
next step.
- Check Fuse
- Turn ignition off. Check
instrument panel fuse block fuse No. 1 (10-amp). If fuse is okay, go
to next step. If fuse is not okay, replace fuse and retest system
operation. If fuse fails again, check for short to ground in Yellow
wire between instrument panel fuse block and speed control
servo/actuator. Repair as necessary and retest system
operation.
- Check Speed Control Servo/Actuator Ground
Circuit
- Using an ohmmeter, check resistance between ground
and speed control servo/actuator connector C177 terminal No. 10. See Fig 1
. If resistance
is less than 5 ohms, repair open in Yellow wire between instrument
panel fuse block and speed control servo/actuator. Retest system
operation. If resistance is 5 ohms or more, repair open in Blue wire
between speed control servo/actuator and ground.
- Check Stoplight Operation
- Check
stoplight operation while pressing brake pedal. If stoplights operate
properly, go to next step. If stoplights do not operate properly, see
appropriate EXTERIOR LIGHTS wiring diagram in SYSTEM WIRING DIAGRAMS
article in the WIRING DIAGRAMS section to continue diagnosis.
- Check Brake Circuit
- Using an
ohmmeter, check resistance between speed control servo/actuator
connector C177 terminals No. 4 and 10. If resistance is less than 20
ohms, go to step 8). If resistance is 20 ohms or more and vehicle is
equipped with M/T, go to next step. If resistance is 20 ohms or more
and vehicle is equipped with A/T, repair Green wire between speed
control servo/actuator and Brake Pedal Position (BPP) switch. Retest
system operation.
- Check Clutch Pedal Position (CPP)
Switch
- Ensure ignition is off. Disconnect CPP switch
connector C292 (located on top of clutch pedal support). Using an
ohmmeter, check resistance between CPP switch terminals (switch side).
If resistance is less than 5 ohms, go to next step. If resistance is 5
ohms or more, replace CPP switch and retest system operation.
- Check Green Wire For Open
- Ensure
ignition is off. Disconnect BPP switch connector C245 (located on top
of brake pedal support). Using an ohmmeter, check resistance in Green
wire between CPP switch connector C292 and BPP switch connector C245.
If resistance is less than 5 ohms, repair White or Green wire between
speed control servo/actuator and CPP switch. Retest system operation.
If resistance is 5 ohms or more, repair open in Green wire between CPP
switch and BPP switch. Retest system operation.
- Check Deactivator Switch Input To Speed
Control Servo/Actuator
- Ensure ignition is off. Using a
voltmeter, check voltage between speed control servo/actuator
connector C177 terminals No. 9 and 10. See
Fig 1
. If voltage is 10
volts or less, go to next step. If voltage is more than 10 volts, go
to step 11).
- Check Deactivator Switch
- Ensure
ignition is off. Disconnect deactivator switch connector C208 (located
on top of brake pedal support). Using an ohmmeter, check resistance
between deactivator switch terminals (switch side). If resistance is
less than 5 ohms, go to next step. If resistance is 5 ohms or more,
replace deactivator switch and retest system operation.
- Check For Power To Deactivator Switch
- Using a voltmeter, check voltage between ground and deactivator
switch connector C208 Green/White wire terminal. If voltage is more
than 10 volts, repair Green/Yellow wire between deactivator switch and
speed control servo/actuator. Retest system operation. If voltage is
10 volts or less, repair Green/White wire between instrument panel
fuse block and deactivator switch. Retest system operation.
- Check Red/Yellow Wire For Short To
Power
- Ensure ignition is off. Using a voltmeter, check
voltage between speed control servo/actuator connector C177 terminals
No. 5 and 10. See
Fig 1
. If voltage is
indicated, go to next step. If no voltage is indicated, go to step
14).
- Check For Stuck Speed Control Switch
-
Disconnect speed control switch connector C269 (located in steering
wheel, under air bag module). Turn ignition switch to RUN position.
Using a voltmeter, check voltage between speed control servo/actuator
connector C177 terminals No. 5 and 10. See
Fig 1
. If voltage is
indicated, go to next step. If no voltage is indicated, replace speed
control switches and retest system operation.
- Check Red/Yellow Wire For Short To
Power
- Ensure ignition is off. Disconnect air bag sliding
contact connector C248 (located under steering wheel). Turn ignition
to RUN position. Using a voltmeter, check voltage between speed
control servo/actuator connector C177 terminals No. 5 and 10. See
Fig 1
. If voltage is
indicated, repair short to power in Red/Yellow wire between air bag
sliding contact and speed control servo/actuator. Retest system
operation. If no voltage is indicated, replace air bag sliding contact
and retest system operation.
- Check Speed Control Switch SET/ACCEL
Operation
- Using an ohmmeter, check resistance between speed
control servo/actuator connector C177 terminals No. 5 and 6 while
pressing speed control SET/ACCEL switch. If resistance is 640-720
ohms, go to next step. If resistance is not 640-720 ohms, go to step
16).
- Check Speed Control Switch ON
Operation
- Turn ignition switch to RUN position. Using a
voltmeter, check voltage between speed control servo/actuator
connector C177 terminals No. 5 and 6 while pressing speed control ON
switch. If voltage is more than 10 volts, go to step 19). If voltage
is 10 volts or less, replace speed control switch and retest system
operation.
- Check Red/Yellow Wire For Open
-
Ensure ignition is off. Disconnect air bag sliding contact connector
C248 (located under steering wheel). Using an ohmmeter, check
resistance in Red/Yellow wire between air bag sliding contact
connector C248 (male side) and speed control servo/actuator connector
C177 terminal No. 5. If resistance is less than 5 ohms, go to next
step. If resistance is 5 ohms or more, repair open in Red/Yellow wire
and retest system operation.
- Check Red/Blue Wire For Open
- Using
an ohmmeter, check resistance in Red/Blue wire between air bag sliding
contact connector C248 (male side) and speed control servo/actuator
connector C177 terminal No. 6. If resistance is less than 5 ohms, go
to next step. If resistance is 5 ohms or more, repair open in Red/Blue
wire and retest system operation.
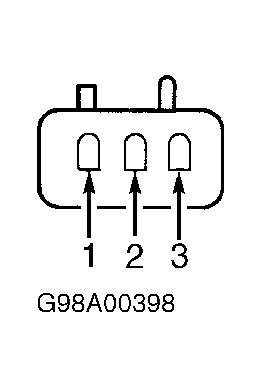
- Check Air Bag Sliding Contact
-
Disconnect speed control switch connector C269 (located in steering
wheel, under air bag module). Using an ohmmeter, check resistance
between speed control switch connector C269 (female side) terminals
No. 1 and 2 while pressing speed control SET/ACCEL switch. See
Fig 2
. If resistance is
640-720 ohms, replace air bag sliding contact and retest system
operation. If resistance is not 640-720 ohms, replace speed control
switch and retest system operation.
- Check Speedometer Operation
- Test
drive vehicle and observe speedometer operation. If speedometer
operates properly, go to next step. If speedometer does not operate
properly, see appropriate INSTRUMENT PANELS article to continue
diagnosis.
- Check Speed Control Servo/Actuator Cable
& Throttle Body Linkage
- Ensure ignition is off. Remove
speed control servo/actuator cable from speed control servo/actuator.
Inspect cable by pulling end of cable and observing throttle movement.
Replace cable if broken or binding. Retest system operation. If cable
is okay, replace servo/actuator and retest system operation.
 Courtesy of FORD MOTOR CO.
 Courtesy of FORD MOTOR CO.