Dust and Pollen Filter Replacement
- Open the glove box, then open the glove box lid (A).
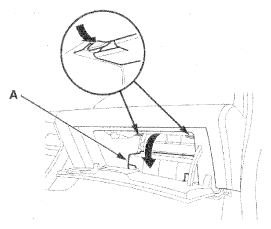 Courtesy of AMERICAN HONDA MOTOR CO., INC.
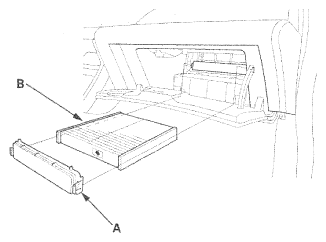
- Remove the lid (A) from the blower unit.
 Courtesy of AMERICAN HONDA MOTOR CO., INC.
- Pull out the dust and pollen filter (B).
- Install the filter in the reverse order of removal. Make sure that there is no air leaking out of the blower unit.
- If the Maintenance Minder required replacing the dust and pollen filter, reset the Maintenance Minder (see
MAINTENANCE MINDER™
), and this procedure is complete. If the Maintenance Minder did not require the dust and pollen filter replacement, go to step 6.
- Turn the ignition switch to LOCK (0).
- Connect the HDS to the DLC (see step 2 on
GENERAL TROUBLESHOOTING INFORMATION
).
- Turn the ignition switch to ON (II).
- Make sure the HDS communicates with the vehicle and ECM/PCM. If it does not communicate, troubleshoot the DLC circuit (see
DLC CIRCUIT TROUBLESHOOTING
).
- Go to the Individual Maintenance Item Reset (see
MAINTENANCE SUB ITEMS
), and do the MAINTENANCE SUB ITEM 2 RESET.