Stabilizer Link Removal/Installation
- Raise and support the vehicle (see
LIFT AND SUPPORT POINTS
).
- Remove the front wheel.
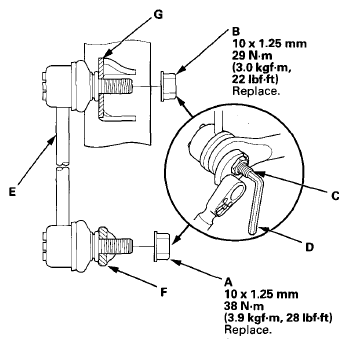
- Remove the self-locking nut (A) and the flange nut (B) while holding the respective joint pin (C) with a hex wrench (D), then remove the stabilizer link (E).
 Courtesy of AMERICAN HONDA MOTOR CO., INC.
- Install the stabilizer link on the stabilizer bar (F) and the damper (G) with the joint pins set at the center of their range of movement.
- Install the new self-locking nut and the new flange nut, and tighten them to the specified torque while holding the respective joint pin with a hex wrench.
- Clean the mating surfaces between the brake disc and the inside of the wheel, then install the front wheel.
- Test-drive the vehicle.
- After 5 minutes of driving, tighten the self-locking nut again to the specified torque.