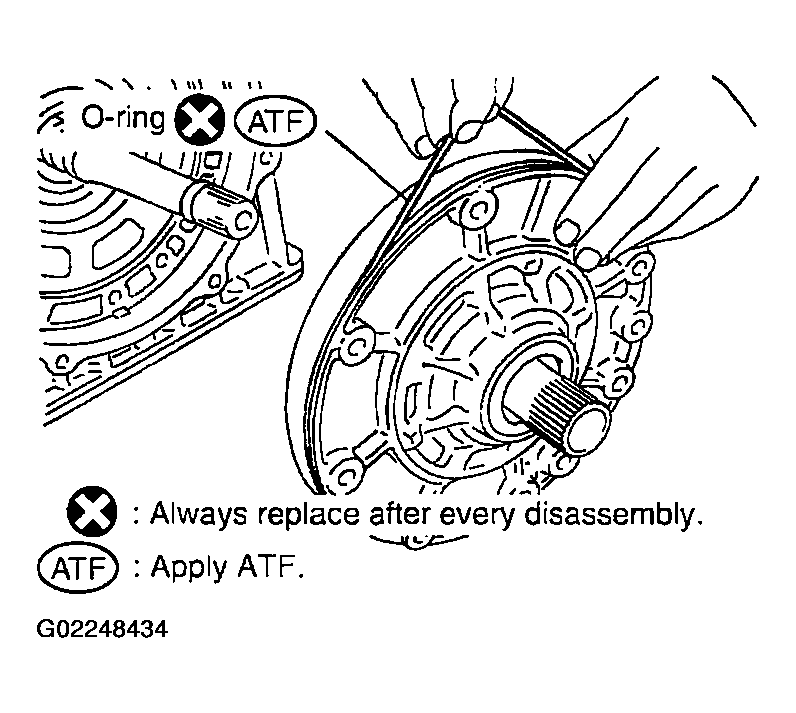
- Install O-ring to oil pump assembly.
CAUTION:
- Do not reuse O-ring.
- Apply ATF to O-ring.
 Courtesy of NISSAN MOTOR CO., U.S.A.
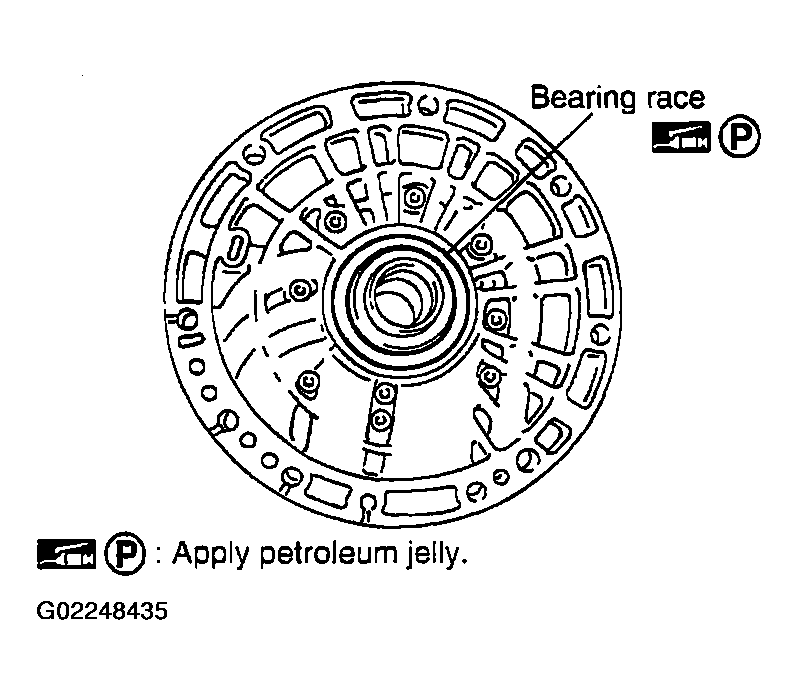
- Install bearing race to oil pump assembly.
CAUTION:
Apply petroleum jelly to bearing race.
 Courtesy of NISSAN MOTOR CO., U.S.A.
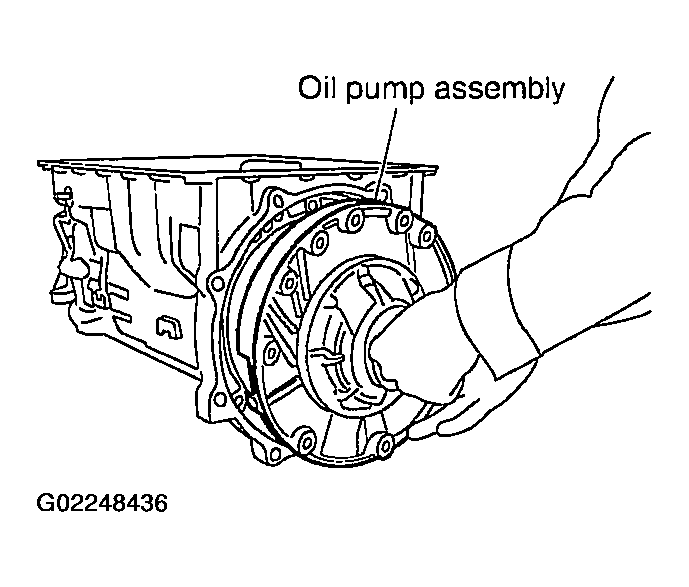
- Install oil pump assembly in transmission case.
CAUTION:
Apply ATF to oil pump radial bearing.
 Courtesy of NISSAN MOTOR CO., U.S.A.
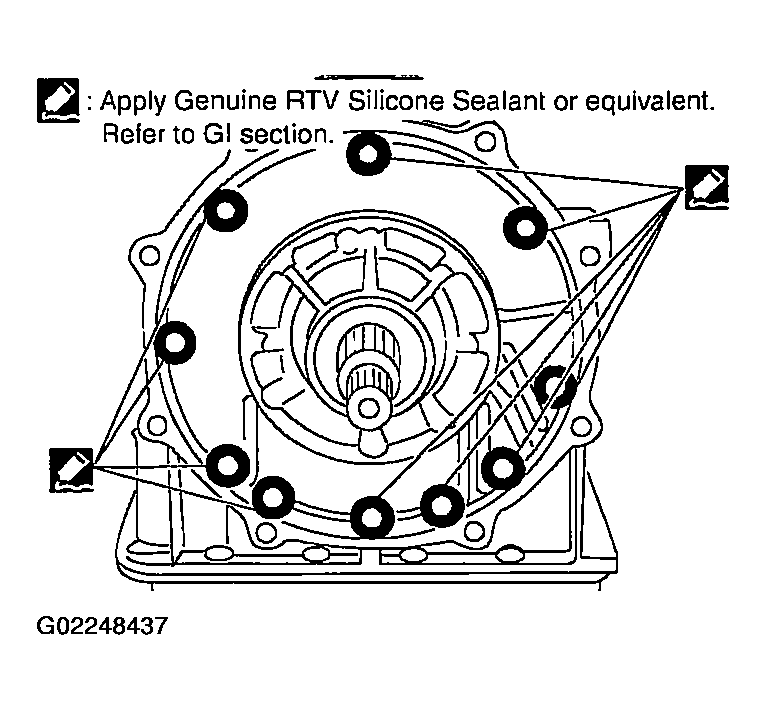
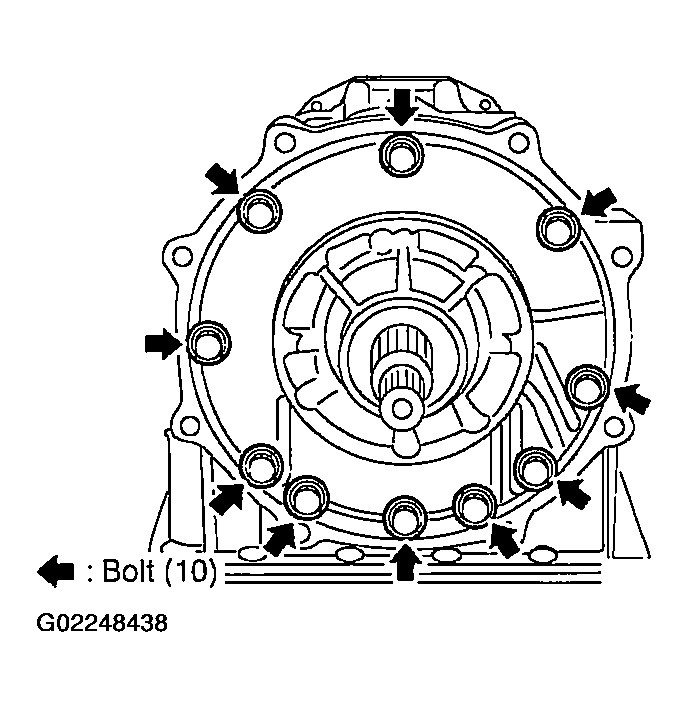
- Apply RECOMMENDED SEALANTS
to oil pump assembly as shown in Fig 4.
CAUTION:
Complete remove all moisture, oil and old sealant, etc. From the oil pump mounting bolts and oil pump mounting bolt mounting surfaces.
 Courtesy of NISSAN MOTOR CO., U.S.A.
- Tighten oil pump mounting bolts to specified torque. Refer to
COMPONENTS .
CAUTION:
Apply ATF to oil pump bushing.
 Courtesy of NISSAN MOTOR CO., U.S.A.
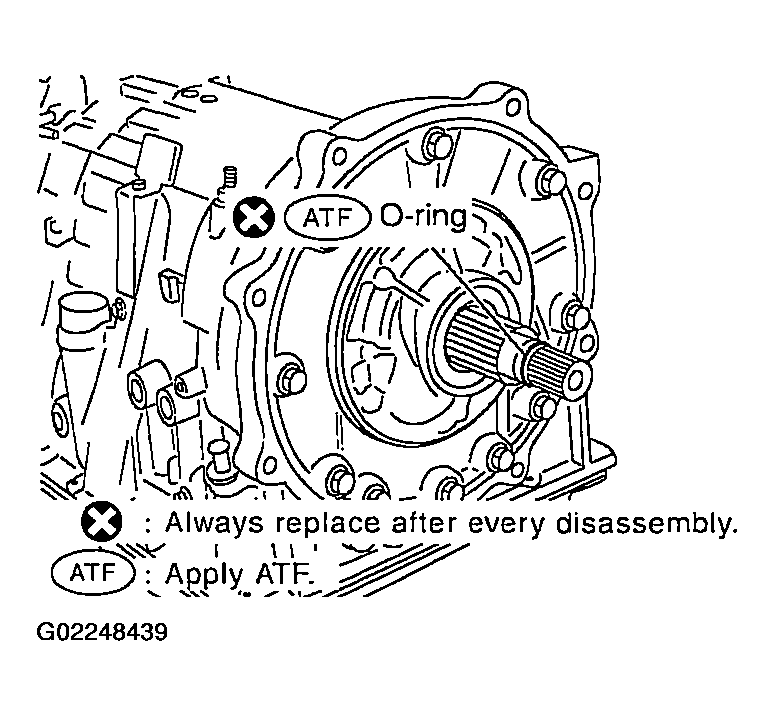
- Install O-ring to input clutch assembly.
CAUTION:
- Do not reuse O-ring.
- Apply ATF to O-ring.
 Courtesy of NISSAN MOTOR CO., U.S.A.
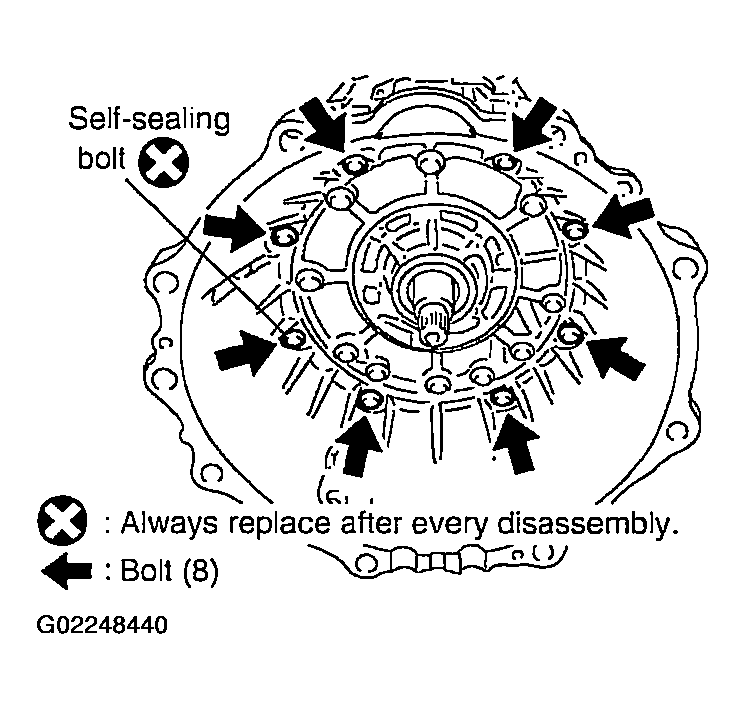
- Install converter housing to transmission case.
CAUTION:
Do not reuse self-sealing bolt.
- Converter housing mounting bolt:
- ==> : 52 N.m (5.3 kg-m, 38 ft-lb)
- Self-sealing bolt:
- ==> : 61 N.m (6.2 kg-m, 45 ft-lb)
 Courtesy of NISSAN MOTOR CO., U.S.A.
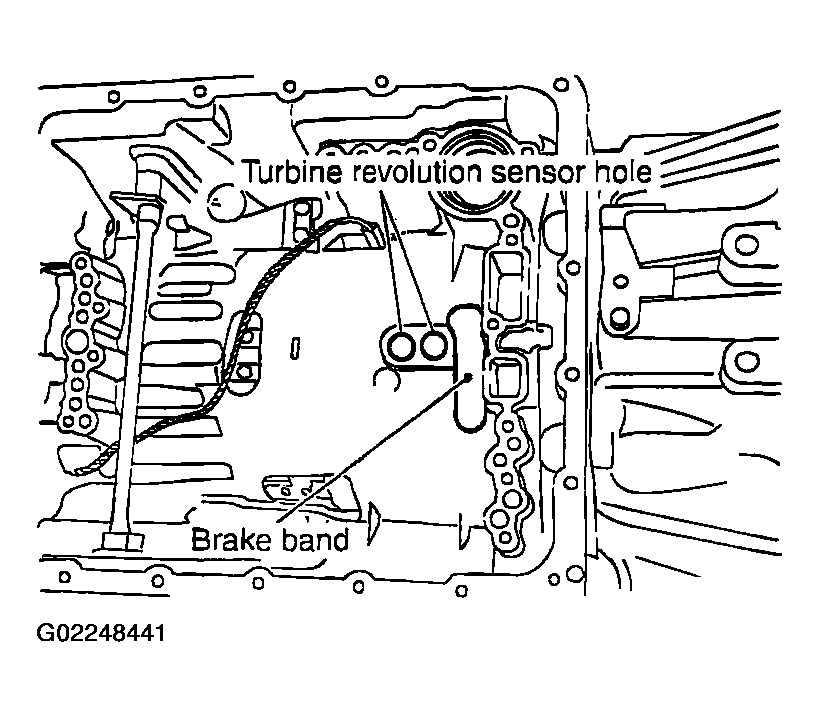
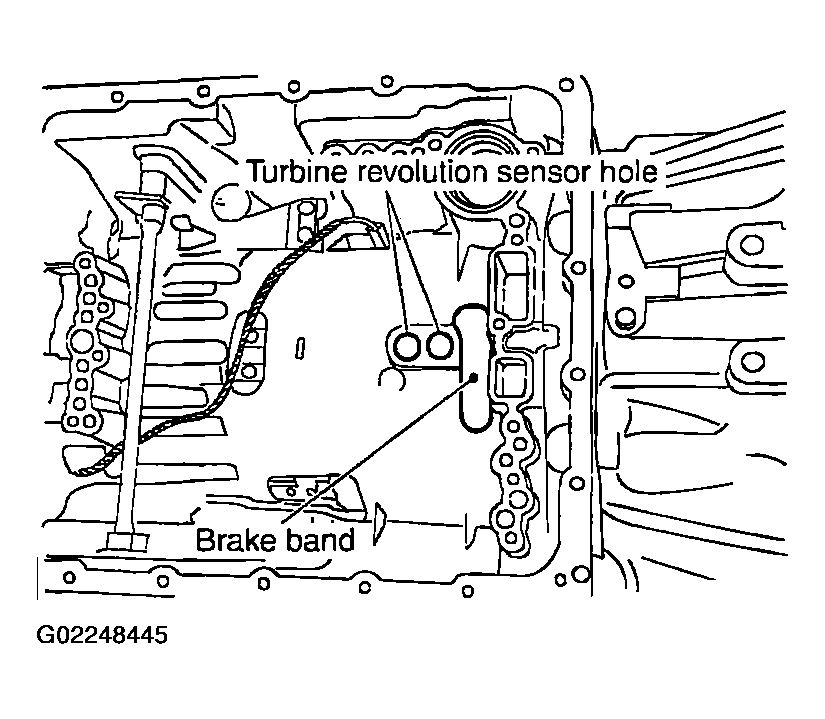
- Make sure that brake band does not close turbine revolution sensor hole.
 Courtesy of NISSAN MOTOR CO., U.S.A.
- Install control valve with TCM.
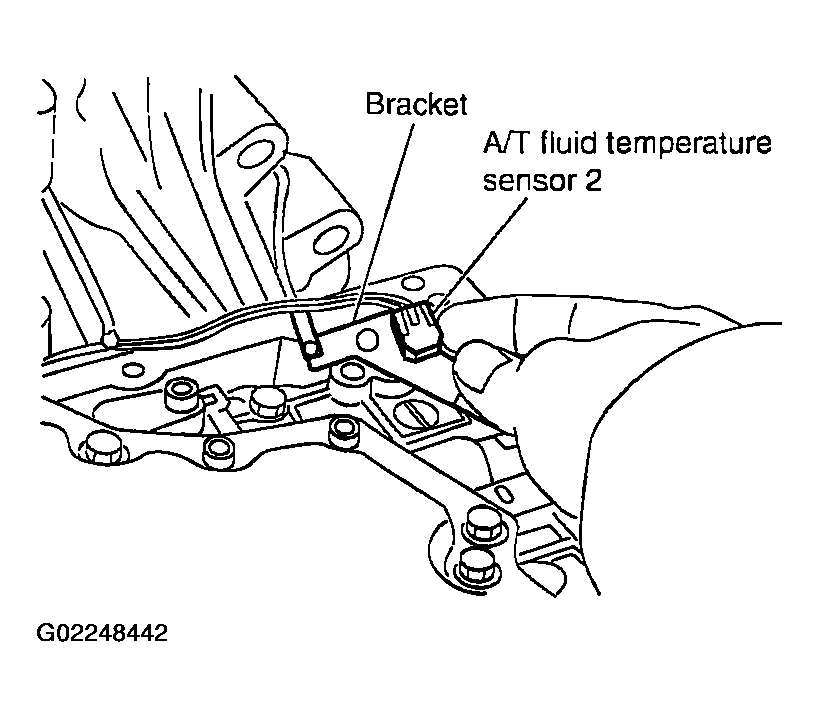
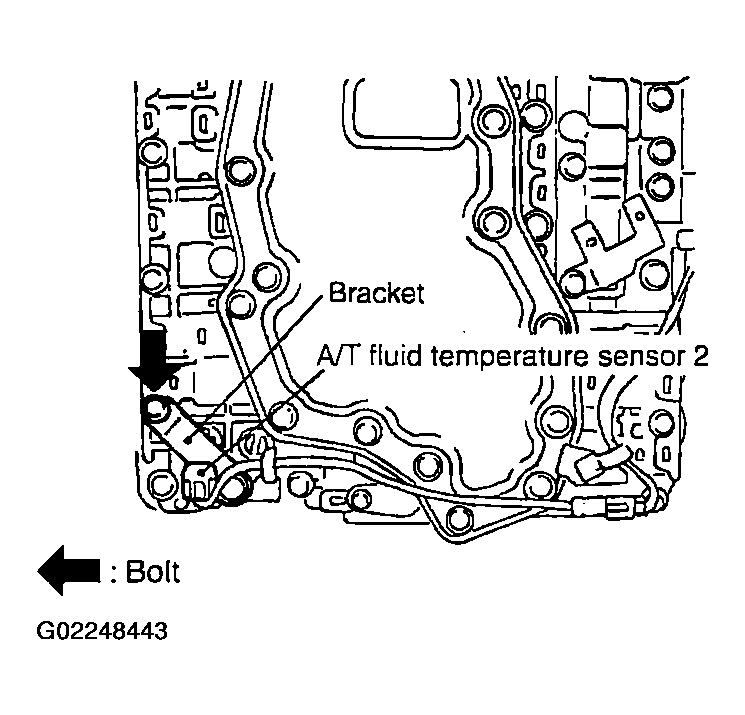
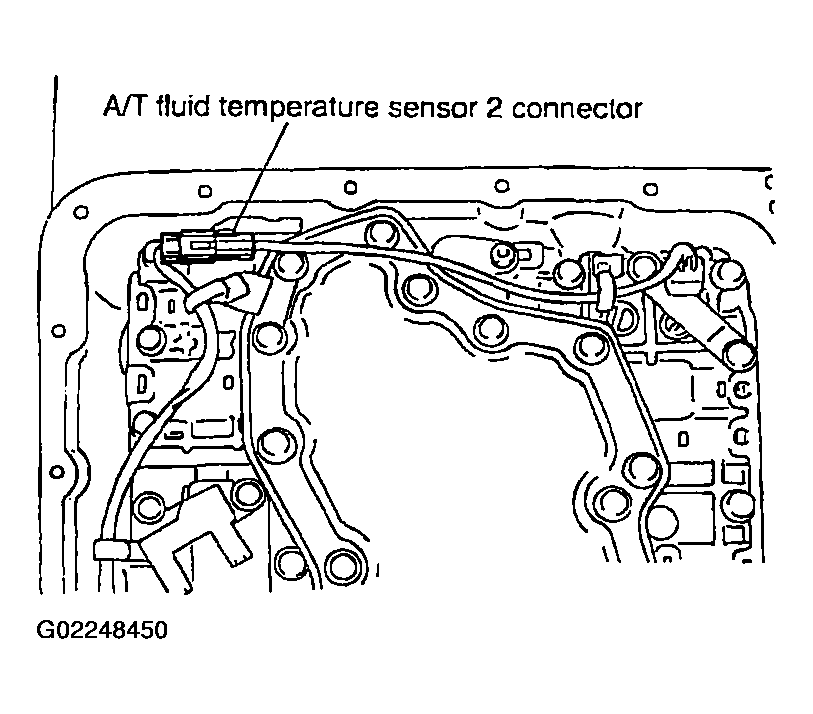
- Install A/T fluid temperature sensor 2 to bracket.
 Courtesy of NISSAN MOTOR CO., U.S.A.
- Install A/T fluid temperature sensor 2 (with bracket) in control valve with TCM. Tighten A/T fluid temperature sensor 2 mounting bolt to the specified torque. Refer to
COMPONENTS .
CAUTION:
Adjust bolt hole of bracket to bolt hole of control valve with TCM.
 Courtesy of NISSAN MOTOR CO., U.S.A.
- Install O-ring to A/T assembly harness connector.
CAUTION:
- Do not reuse O-ring.
- Apply ATF to O-ring.
 Courtesy of NISSAN MOTOR CO., U.S.A.
- Install control valve with TCM in transmission case.
CAUTION:
- Make sure that turbine revolution sensor securely installs turbine revolution sensor hole.
- Adjust A/T assembly harness connector of control valve with TCM to terminal hole of transmission case.
- Hang down revolution sensor harness toward outside so as not to disturb installation of control valve with TCM.
 Courtesy of NISSAN MOTOR CO., U.S.A.
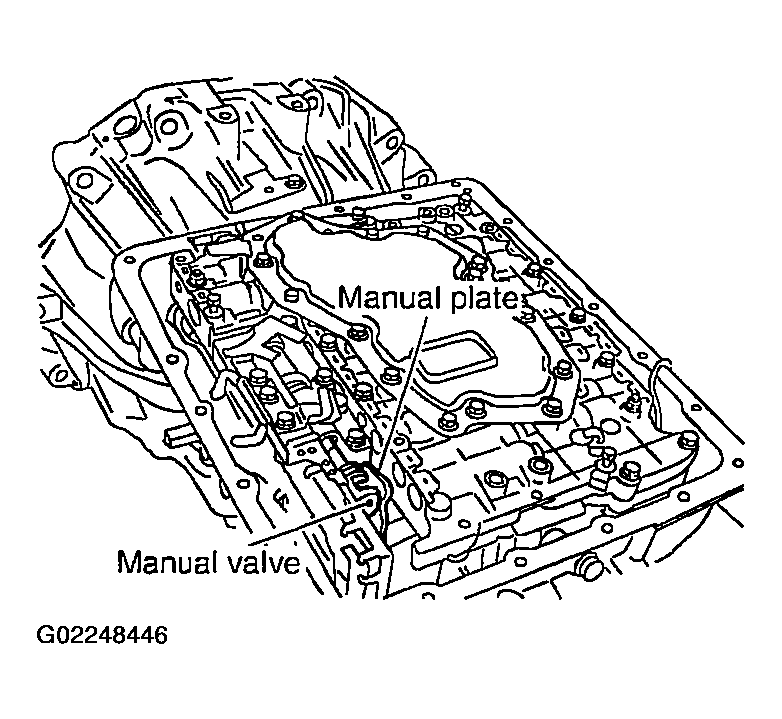
- Assemble it so that manual valve cutout is engaged with manual plate projection.
 Courtesy of NISSAN MOTOR CO., U.S.A.
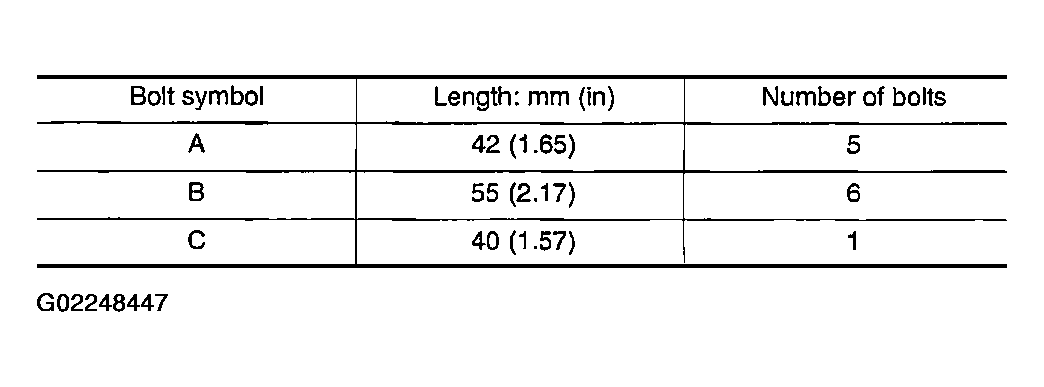
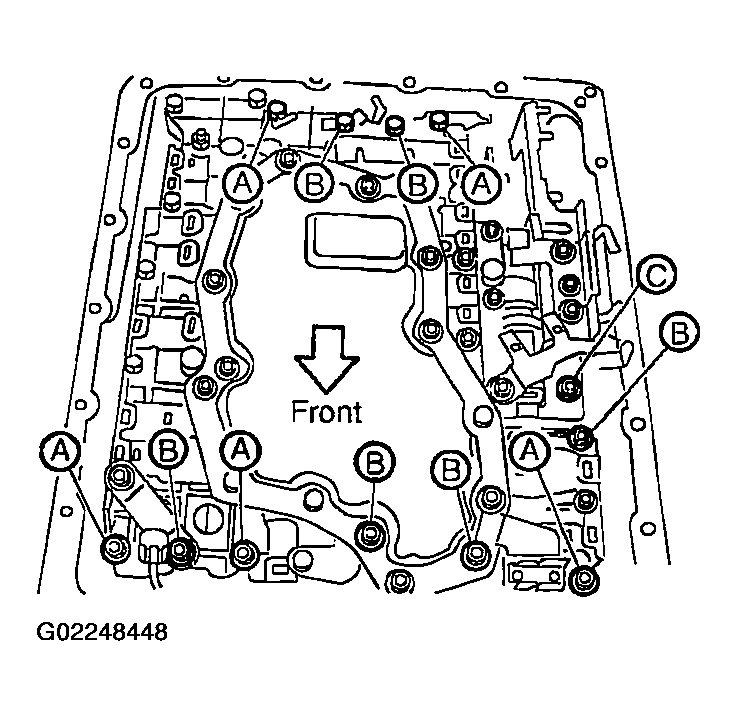
- Install bolts A, B and C to control valve with TCM.
 Courtesy of NISSAN MOTOR CO., U.S.A.
 Courtesy of NISSAN MOTOR CO., U.S.A.
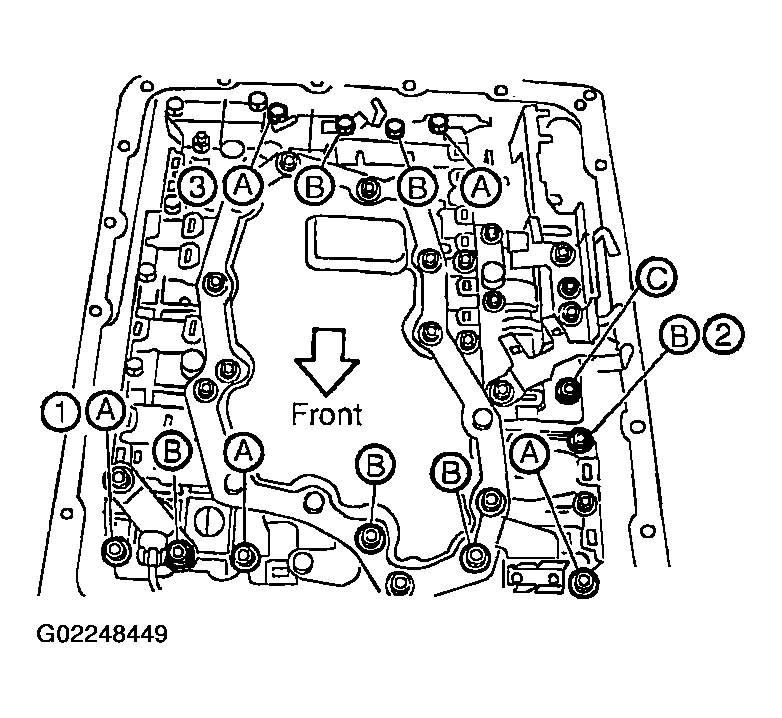
- Tighten bolt 1, 2 and 3 temporarily to prevent dislocation. After that tighten them in order (1 ==> 2 ==> 3), and then tighten other bolts.
- Tighten control valve with TCM mounting bolts to the specified torque. Refer to
COMPONENTS .
 Courtesy of NISSAN MOTOR CO., U.S.A.
- Connect A/T fluid temperature sensor 2 connector.
 Courtesy of NISSAN MOTOR CO., U.S.A.
- Securely fasten A/T fluid temperature sensor 2 harness with terminal clip.
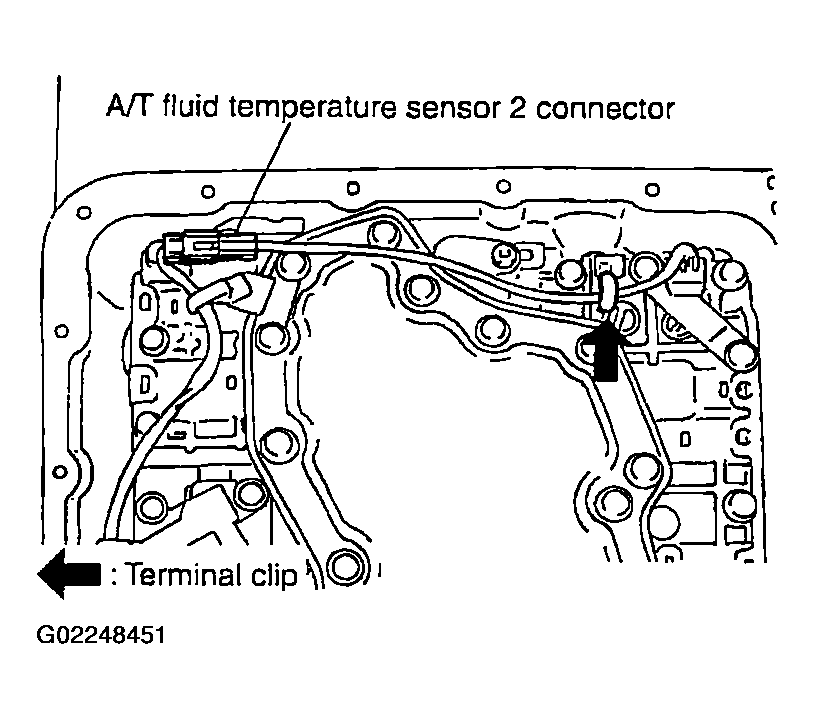 Courtesy of NISSAN MOTOR CO., U.S.A.
- Connect revolution sensor connector.
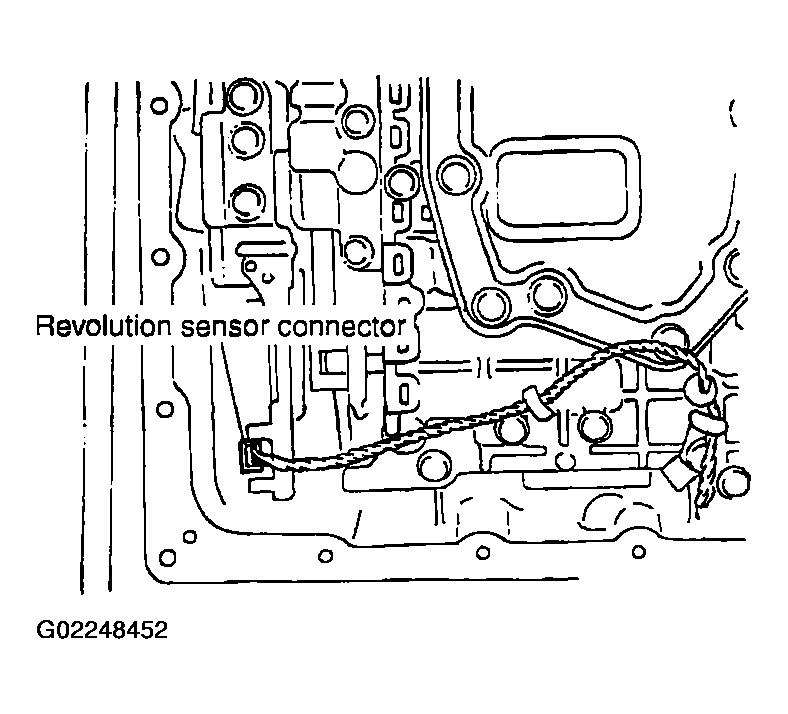 Courtesy of NISSAN MOTOR CO., U.S.A.
- Securely fasten revolution sensor harness with terminal clips.
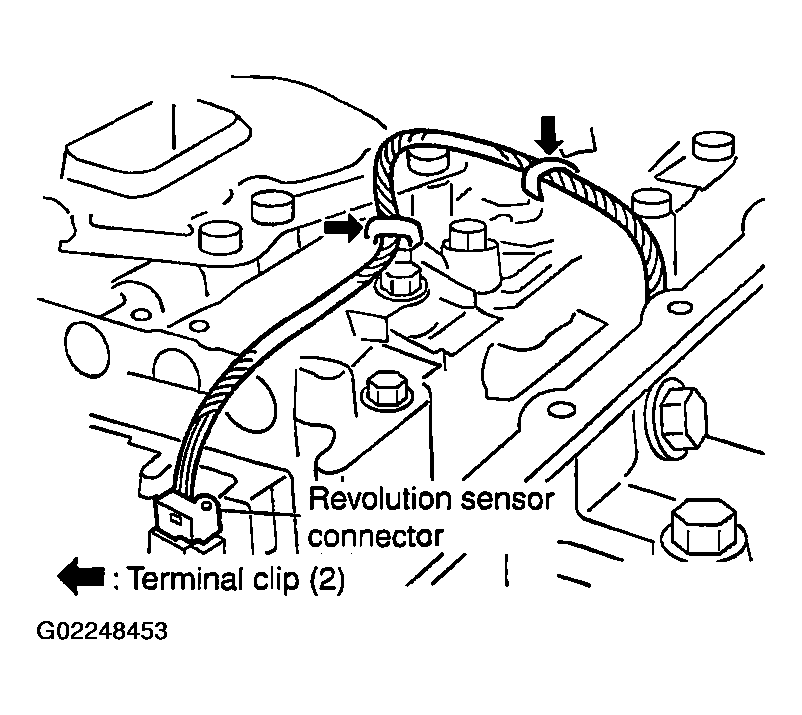 Courtesy of NISSAN MOTOR CO., U.S.A.
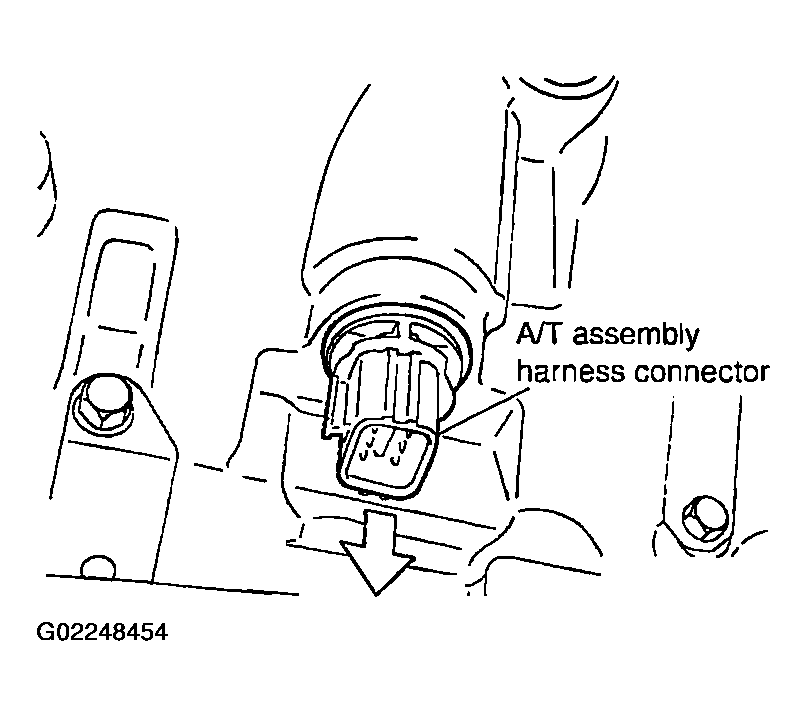
- Pull down A/T assembly harness connector.
CAUTION:
Be careful not to damage connector.
 Courtesy of NISSAN MOTOR CO., U.S.A.
- Install snap ring to A/T assembly harness connector.
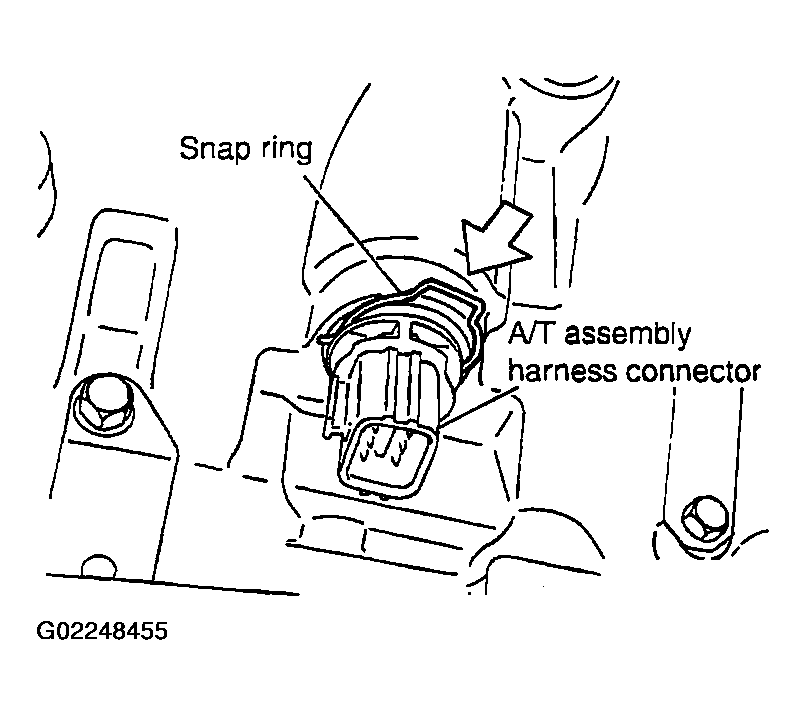 Courtesy of NISSAN MOTOR CO., U.S.A.
- Install magnets in oil pan.
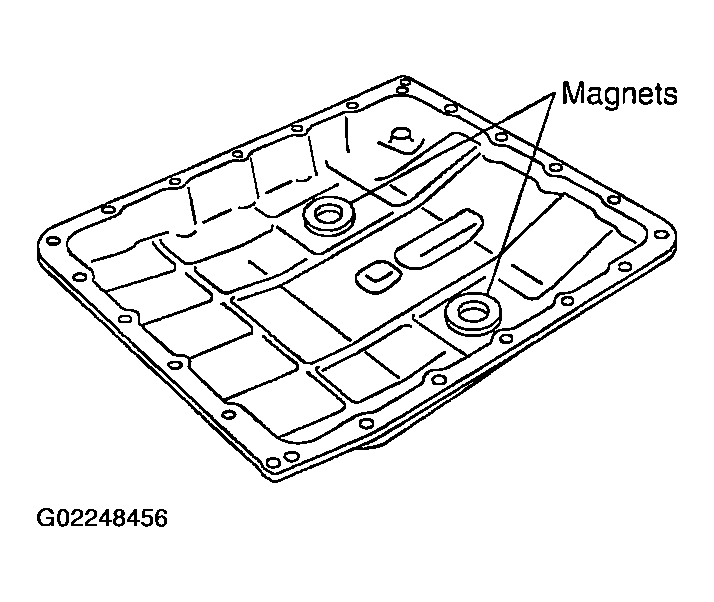 Courtesy of NISSAN MOTOR CO., U.S.A.
- Install oil pan to transmission case.
- Install oil pan gasket to oil pan.
CAUTION:
- Do not reuse oil pan gasket.
- Install it in the direction to align hole positions.
- Complete remove all moisture, oil and old gasket, etc. From the oil pan gasket mounting surfaces.
- Install oil pan (with oil pan gasket) to transmission case.
 Courtesy of NISSAN MOTOR CO., U.S.A.
CAUTION:
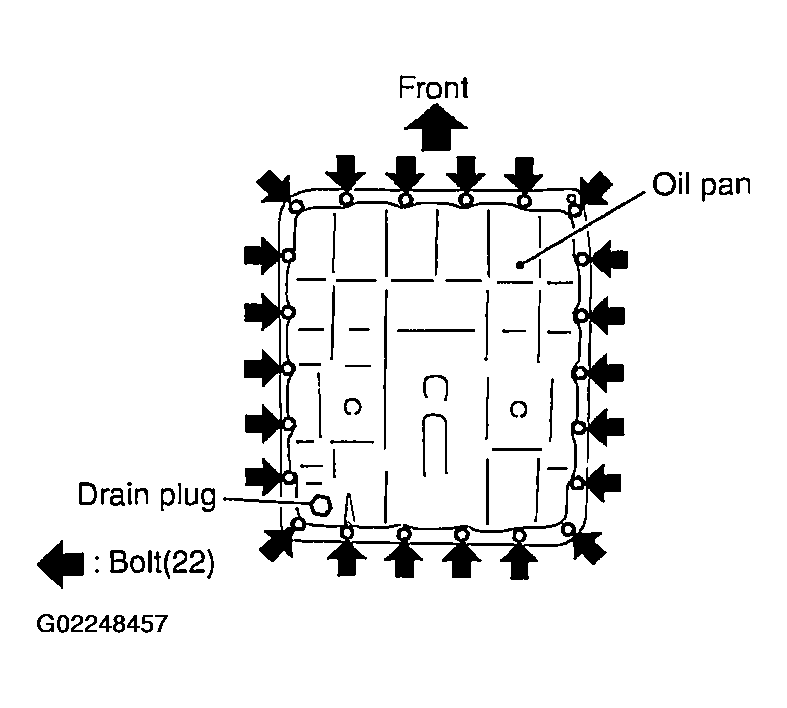
- Install it so that drain plug comes to the position as shown in Fig 24.
- Be careful not to pinch harnesses.
- Complete remove all moisture, oil and old gasket, etc. From the oil pan mounting surfaces.
- Tighten oil pan mounting bolts to the specified torque in numerical order shown in Fig 25 after temporarily tightening them. Refer to
COMPONENTS .
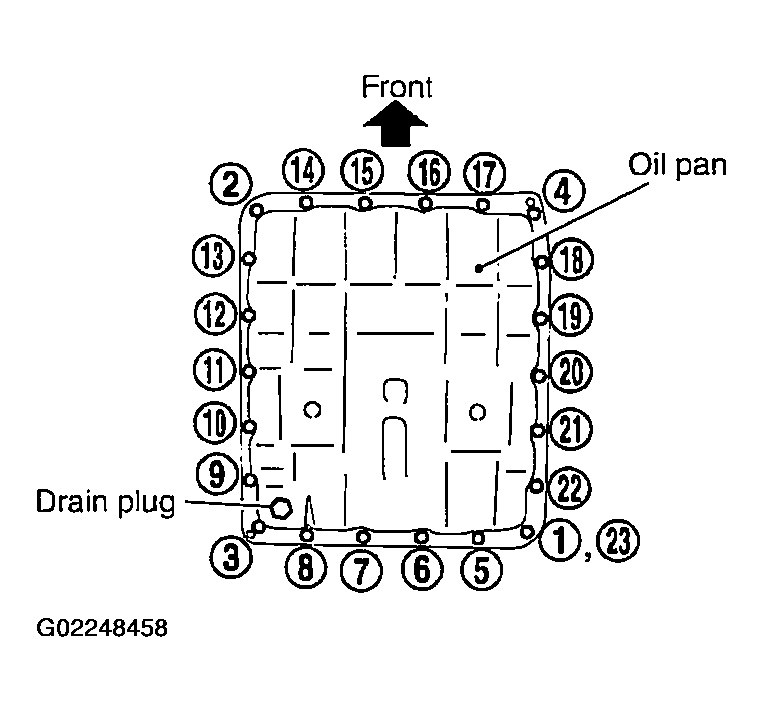 Courtesy of NISSAN MOTOR CO., U.S.A.
CAUTION:
Do not reuse oil pan mounting bolts.
- Install drain plug to oil pan. Tighten drain plug to the specified torque. Refer to
COMPONENTS .
CAUTION:
Do not reuse drain plug gasket.
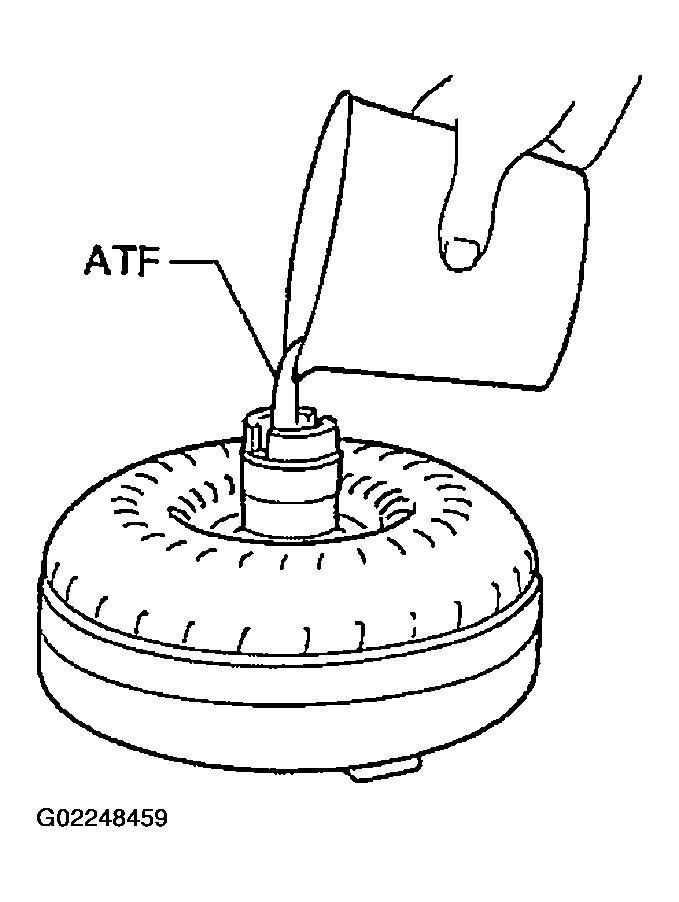
- Install torque converter.
- Pour ATF into torque converter.
- Approximately 2 liter (2-1/8 US qt, 1-3/4 Imp qt) of fluid is required for a new torque converter.
- When reusing old torque converter, add the same amount of fluid as was drained.
 Courtesy of NISSAN MOTOR CO., U.S.A.
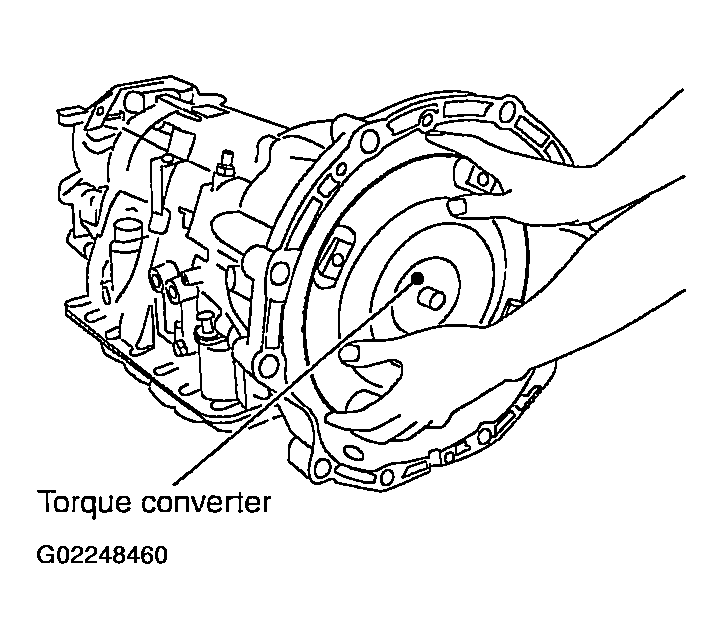
- Install torque converter while aligning notches of torque converter with notches of oil pump.
CAUTION:
Install torque converter while rotating it.
 Courtesy of NISSAN MOTOR CO., U.S.A.
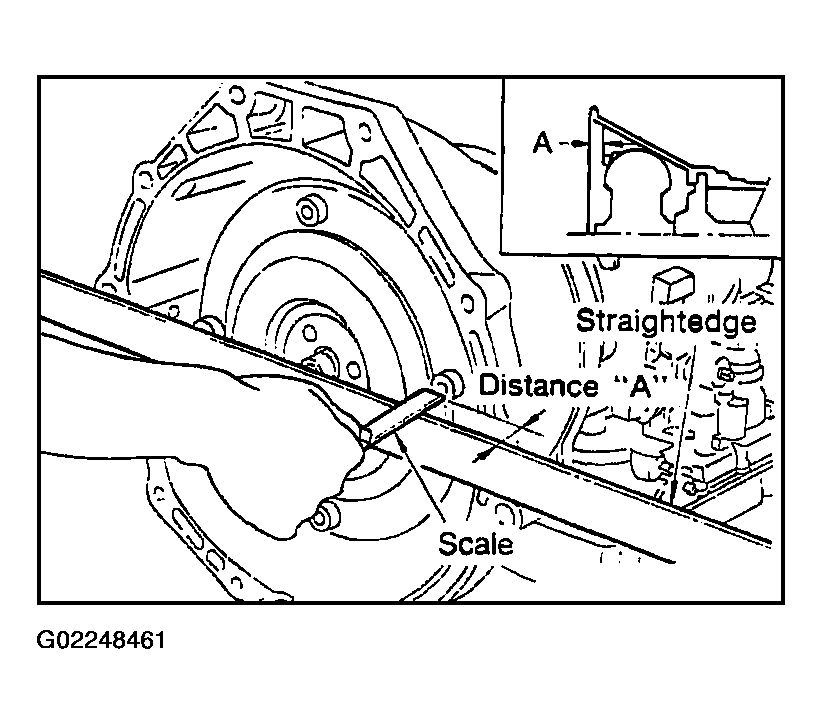
- Measure distance "A" to check that torque converter is in proper position.
 Courtesy of NISSAN MOTOR CO., U.S.A.
- Distance "A":
- : 24.0 mm (0.94 in) or more