Removal And Installation: 2.4L: Installation
- Install a new seal on the tank.
 Courtesy of CHRYSLER GROUP, LLC
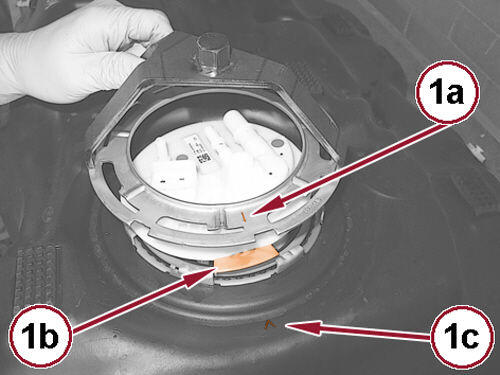
- Install the fuel pump assembly, taking care to match the references (1a), (1b) and (1c) indicated in the figure.
- Tighten the fuel pump assembly lock nut.
- Using the hydraulic lift, put the fuel tank into position.
- Engage the fuel delivery pipe with the retaining clips.
- Connect the quick coupling of the vapor hose from the fuel tank to the canister.
 Courtesy of CHRYSLER GROUP, LLC
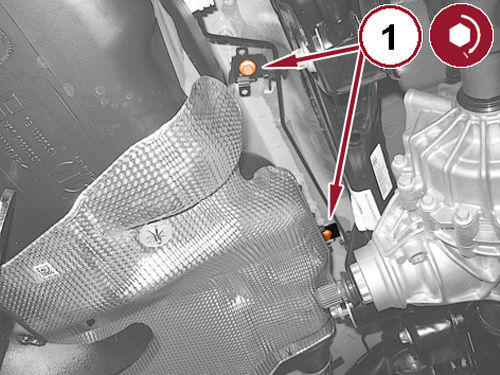
- Install the rear support bracket bolts (1) and tighten to the proper specification. Refer to FUEL DELIVERY, SPECIFICATIONS .
 Courtesy of CHRYSLER GROUP, LLC
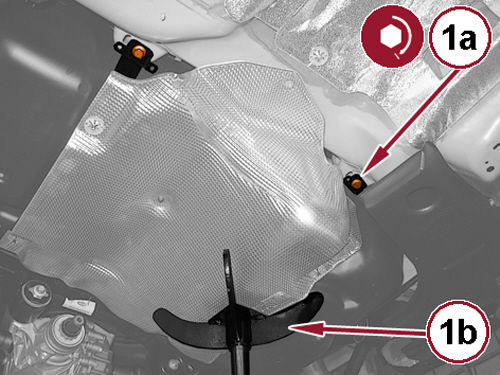
- Install the front support bracket bolts (1a) and tighten to the proper specification. Refer to FUEL DELIVERY, SPECIFICATIONS .
- Remove the hydraulic lift (1b).
- Engage the right rear brake lines and close the retaining clips.
- Engage the rear brake lines and close the retaining clips.
- Install the toothed washer securing the heat shield to the body.
- Install the right side cover, tighten the hardware and install the retainer buttons.
- Engage the fuel vapor hose with the retaining clips.
- Connect the hose to the fuel fill tube and tighten the clamp.
- Connect the quick coupling of the vapor pipe.
- Connect the quick coupling of the fuel delivery pipe.
- Connect the electrical connection of the electric fuel pump.
- Install the access covers for the fuel pump and securely tighten the screws.
- Install the rear seat cushion. Refer to SEAT CUSHION, REMOVAL AND INSTALLATION
.
- Install the underbody shields. Refer to UNDER BODY PROTECTION
.
- Remove the vehicle from the lift.