Rear Light Failure Sensor
- If rear light failure warning light is not operating correctly, disconnect harness connector from rear light failure sensor, located in trunk. Turn ignition on and ensure warning light glows. Start engine and ensure warning light goes out. If operation is not as specified, check bulb and bulb check relay. See BULB CHECK RELAY TEST .
- Using a DVOM check for continuity between ground and terminals No. 1, 4, 5 and 9. See Fig 1. Continuity should exist on all terminals. Terminals No. 1, 4 and 5 will read slight resistance as they are grounded through bulbs. If continuity is as specified, go to next step. If continuity is not as specified, repair wiring.
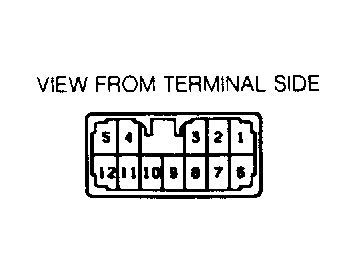 Courtesy of © TOYOTA, LICENSE AGREEMENT TMS1002
- Check for voltage between terminal No. 10 and ground. With headlights off, no voltage should exist. Turn headlights on. If battery voltage now exists, go to next step. If battery voltage does not now exist, check headlight switch and wiring.
- Check for voltage between terminal No. 3 and ground. With engine off, no voltage should exist. Start engine. If battery voltage now exists, go to next step. If battery voltage does not exist, check bulb check relay and wiring between instrument panel and rear light failure sensor. See BULB CHECK RELAY TEST .
- Check for voltage between terminal No. 7 and ground. With brake pedal released, no voltage should exist. Depress brake pedal. If battery voltage now exists, go to next step. If battery voltage does not exist, check brake switch and wiring.
- Check for voltage between terminal No. 2 and ground. With ignition switch in LOCK or ACC position, no voltage should exist. Turn ignition on. If battery voltage does not exist, check ignition switch and wiring. If battery voltage now exists, test is complete. Substitute known good rear light failure sensor and recheck warning light operation.