Ultrasonic Sensor: Installation
- INSTALL NO. 1 ULTRASONIC SENSOR
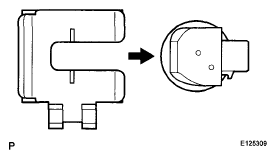
- Install the No. 1 ultrasonic sensor to the rear bumper.
 Courtesy of © TOYOTA, LICENSE AGREEMENT TMS1002
- Install the sensor retainer as shown in the illustration.
- Connect the sensor connector.
- INSTALL NO. 2 ULTRASONIC SENSOR
- Install the No. 2 ultrasonic sensor to the rear bumper.
 Courtesy of © TOYOTA, LICENSE AGREEMENT TMS1002
- Install the sensor retainer as shown in the illustration.
- Connect the sensor connector.
 Courtesy of © TOYOTA, LICENSE AGREEMENT TMS1002
- INSTALL REAR BUMPER ASSEMBLY
- INSTALL REAR BUMPER PLATE
- CONNECT LUGGAGE ROOM WIRE
- INSTALL SIDE LUGGAGE COMPARTMENT TRIM COVER
- INSTALL LUGGAGE COMPARTMENT TRIM HOOK
- INSTALL FRONT LUGGAGE COMPARTMENT TRIM COVER
- INSTALL ROPE HOOK
- INSTALL ROOM LIGHT ASSEMBLY
- INSTALL ROPE HOOK ASSEMBLY
- INSTALL REAR LUGGAGE COMPARTMENT TRIM COVER
- INSTALL DECK SIDE TRIM BOX RH
- INSTALL DECK SIDE TRIM BOX LH
- INSTALL LUGGAGE COMPARTMENT TRIM COVER
- INSTALL NO. 1 ULTRASONIC SENSOR
- Install the No. 1 ultrasonic sensor to the front bumper.
- Install the sensor retainer as shown in the illustration.
- Connect the sensor connector.
Courtesy of © TOYOTA, LICENSE AGREEMENT TMS1002
- INSTALL FRONT BUMPER ASSEMBLY
- INSTALL COOL AIR INTAKE DUCT SEAL
- VEHICLE PREPARATION FOR FOG LIGHT AIM
(See
ADJUSTMENT
)
- PREPARATION FOR FOG LIGHT AIMING
(See
ADJUSTMENT
)
- FOG LIGHT AIMING INSPECTION
(See
ADJUSTMENT
)
- FOG LIGHT AIMING ADJUSTMENT
(See
ADJUSTMENT
)