FixVault
Home
›
Lincoln
›
2017
›
Navigator Select, RWD
›
Repair and Diagnosis
›
Transmission
›
Automatic Trans
›
Automatic Transmission - 6R80
›
Disassembly And Assembly Of Subassemblies
›
Direct Clutch Assembly
›
Disassembly
Direct Clutch Assembly: Disassembly
1.
Remove and discard the 2 scarf cut seals and the roller bearing.
Courtesy of FORD MOTOR COMPANY
2.
Remove the T5 thrust bearing.
Courtesy of FORD MOTOR COMPANY
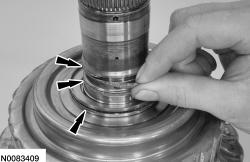
3.
Remove the direct clutch snap ring.
Courtesy of FORD MOTOR COMPANY
4.
Remove the direct clutch steel and friction plates.
Courtesy of FORD MOTOR COMPANY
5.
Install the Clutch Spring Compressors onto the direct clutch assembly.
Courtesy of FORD MOTOR COMPANY
6.
Using the Clutch Spring Compressors, compress the direct clutch return spring and remove the direct clutch return spring retainer.
Courtesy of FORD MOTOR COMPANY
7.
Remove the balance piston.
Courtesy of FORD MOTOR COMPANY
8.
Remove the direct clutch return spring.
Courtesy of FORD MOTOR COMPANY
9.
Remove the direct clutch piston.
Courtesy of FORD MOTOR COMPANY
10.
Remove and discard the outer O-ring seal from the balance piston.
Courtesy of FORD MOTOR COMPANY
11.
Remove and discard the outer and inner O-ring seals from the apply piston.
Courtesy of FORD MOTOR COMPANY
12.
Inspect the components of the direct clutch for damage. If damage is indicated, install new components as necessary.
 Courtesy of FORD MOTOR COMPANY