Fuel Tank: Removal
- REMOVE NO. 1 SEAT LEG COVER
(See
REMOVAL
)
- REMOVE NO. 2 SEAT LEG COVER
(See
REMOVAL
)
- REMOVE REAR SEAT CUSHION WITH COVER PAD SUB-ASSEMBLY LH
(See
REMOVAL
)
- REMOVE REAR FLOOR SERVICE HOLE COVER
(See REMOVAL
)
- DISCHARGE FUEL SYSTEM PRESSURE
(See FUEL SYSTEM
)
- DISCONNECT FUEL TANK MAIN TUBE SUB-ASSEMBLY
(See REMOVAL
)
- DISCONNECT FUEL TANK VENT HOSE
(See REMOVAL
)
- REMOVE FUEL PUMP GAUGE RETAINER
(See REMOVAL
)
- REMOVE FUEL SUCTION WITH PUMP AND GAUGE TUBE ASSEMBLY
(See REMOVAL
)
- DRAIN FUEL
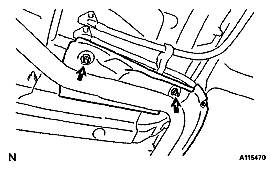
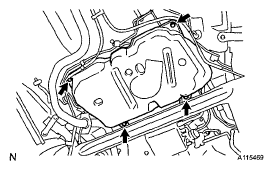
- REMOVE NO. 4 FRONT FLOOR HEAT INSULATOR
- Remove the 2 nuts together with the insulator.
 Courtesy of © TOYOTA, LICENSE AGREEMENT TMS1002
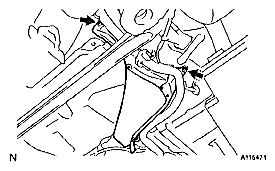
- REMOVE NO. 1 FUEL TANK PROTECTOR
- Remove the bolt together with the clip and remove the No. 1 fuel tank protector.
 Courtesy of © TOYOTA, LICENSE AGREEMENT TMS1002
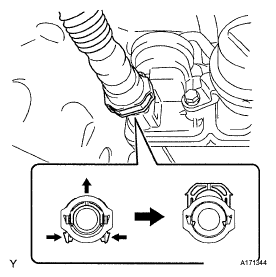
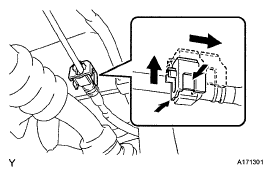
- DISCONNECT FUEL TANK MAIN TUBE SUB-ASSEMBLY
- Release the lock as shown in the illustration, then pull and remove the fuel tank main tube.
NOTE:
- Remove any dirt and foreign matter from the clip before performing this work.
- Avoid any scratches or foreign matter on the parts when disconnecting them, as the quick connector has an O-ring that seals the plug.
- Perform this work by hand. Do not use any tools.
- Do not forcibly bend, twist or turn the nylon tube.
- Protect the disconnected parts by covering them with a plastic bag.
- If the connector and pipe are stuck, disconnect the nylon tube by turning it by hand to release them.
 Courtesy of © TOYOTA, LICENSE AGREEMENT TMS1002
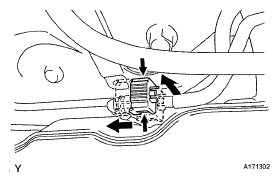
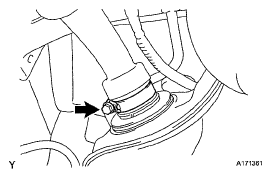
- DISCONNECT FUEL TANK VENT HOSE
- Disconnect the fuel tank vent hose from the charcoal canister assembly.
 Courtesy of © TOYOTA, LICENSE AGREEMENT TMS1002
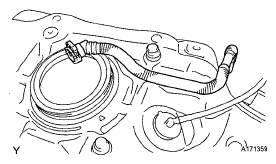
- DISCONNECT FUEL TANK BREATHER HOSE
- Release the lock as shown in the illustration, then pull and remove the fuel tank breather hose.
NOTE:
- Remove any dirt and foreign matter from the clip before performing this work.
- Avoid any scratches or foreign matter on the parts when disconnecting, as the quick connector has an O-ring that seals the plug.
- Perform this work by hand. Do not use any tools.
- Do not forcibly bend, twist or turn the nylon tube.
- Protect the disconnected parts by covering them with a plastic bag.
- If the connector and pipe are stuck, disconnect the nylon tube by turning it by hand to release them.
 Courtesy of © TOYOTA, LICENSE AGREEMENT TMS1002
- DISCONNECT LOWER FUEL TANK FILLER PIPE SUB-ASSEMBLY
- Loosen the clamp and disconnect the fuel tank filler pipe.
 Courtesy of © TOYOTA, LICENSE AGREEMENT TMS1002
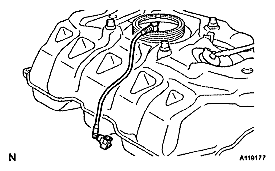
- REMOVE FUEL TANK ASSEMBLY
- Remove the 4 bolts and remove the fuel tank.
 Courtesy of © TOYOTA, LICENSE AGREEMENT TMS1002
- Remove the fuel tank main tube from the fuel tank.
 Courtesy of © TOYOTA, LICENSE AGREEMENT TMS1002
- Remove the fuel tank vent hose from the fuel tank.
 Courtesy of © TOYOTA, LICENSE AGREEMENT TMS1002