Instrument Cluster: Legacy
- Remove instrument cluster. See INSTRUMENT CLUSTER
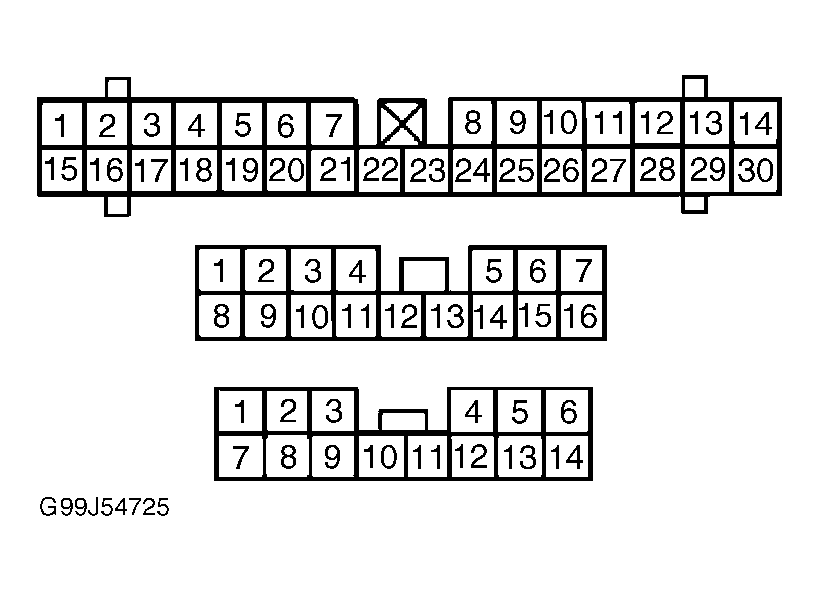
under REMOVAL & INSTALLATION. Turn ignition on. Measure voltage between ground and 30-pin instrument cluster harness connector terminal No. 8. See Fig 1
. If 10 volts or greater is indicated, go to next step. If less than 10 volts is indicated, repair connector and/or wiring harness as necessary. See WIRING DIAGRAMS
.
- Measure voltage between ground and 14-pin instrument cluster harness connector terminal No. 3. If 10 volts or greater is indicated, go to next step. If less than 10 volts is indicated, repair connector and/or wiring harness as necessary.
- Turn ignition off. Using DVOM, measure resistance between ground and 30-pin instrument cluster harness connector terminal No. 20. If resistance is less than 10 ohms, go to next step. If resistance is 10 ohms or greater, repair connector and/or wiring harness as necessary.
- Measure resistance between ground and 16-pin instrument cluster harness connector terminal No. 16. If resistance is less than 10 ohms, go to next step. If resistance is 10 ohms or greater, repair connector and/or wiring harness as necessary.
- If vehicle is equipped with a manual transmission, go to next step. If vehicle is equipped with an automatic transmission, go to step 10
.
- Disconnect Vehicle Speed Sensor (VSS) harness connector. Measure resistance between VSS harness connector terminal No, 1 and instrument cluster 30-pin harness connector terminal No. 13. See Figure
and Fig 1
. If resistance is less than 10 ohms, go to next step. If resistance is 10 ohms or greater, repair wiring harness as necessary.
 Courtesy of SUBARU OF AMERICA, INC.
- Turn ignition on. Measure voltage between ground and VSS harness connector terminal No. 3. If 10 volts or greater is indicated, go to next step. If less than 10 volts is indicated, repair wiring harness as necessary.
- Turn ignition off. Measure resistance between ground and VSS harness connector terminal No. 2. If resistance is less than 10 ohms, go to next step. If resistance is 10 ohms or greater, repair wiring harness as necessary.
- Reconnect VSS harness connector. Raise vehicle on stands or hoist so drive wheels may turn freely. Using oscilloscope positive lead, backprobe VSS harness connector terminal No. 1. Using negative lead, backprobe VSS terminal No. 2. Operate vehicle at 12 MPH or greater. If oscilloscope indicates 5 volts or greater, go to step 12
. If less than 5 volts is indicated, replace VSS.
- Disconnect A/T control module harness connector. Measure resistance between A/T control module harness connector terminal No. 13 and instrument cluster 30-pin harness connector terminal No. 13. See Figure
and Fig 1
. If resistance is less than 10 ohms, go to next step. If resistance is 10 ohms or greater, repair wiring harness as necessary.
- Reconnect A/T control module harness connector. Raise vehicle on stands or hoist so drive wheels may turn freely. Operate vehicle at 6 MPH or greater. Using DVOM, backprobe A/T control module harness connector terminal No. 13 and measure voltage. If less than one volt or greater than 4 volts is indicated, replace speedometer. If 1-4 volts is indicated, replace A/T control module.
- Visually inspect all gauges in instrument cluster for any abnormal condition. Ensure gauges are not stuck or damaged. If no problem is found, go to next step. If problem is found, replace instrument cluster as an assembly.
- Disassemble instrument cluster and remove speedometer and fuel gauge. Measure resistance between speedometer terminals. See Figure
. If resistance is not 192-208 ohms, replace speedometer assembly and go to next step. If resistance is 192-208 ohms, replace printed circuit.
- Disassemble instrument cluster and remove tachometer and water temperature gauge. Measure resistance between tachometer terminals. See Figure
. If resistance is not 192-208 ohms, replace tachometer assembly and go to next step. If resistance is 192-208 ohms, replace printed circuit.
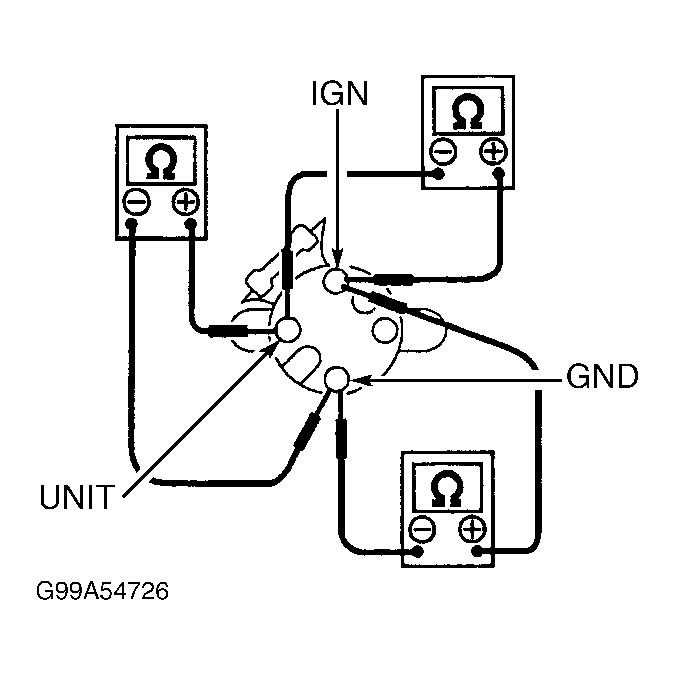
- Using DVOM, measure resistance between fuel gauge terminals IGN and GND. See Fig 2
. If resistance is not 160-180 ohms, go to next step, If resistance is 160-180 ohms, replace instrument cluster printed circuit.
 Courtesy of SUBARU OF AMERICA, INC.
- Measure resistance between fuel gauge terminals IGN and UNIT. If resistance is not 25-45 ohms, go to next step, If resistance is 25-45 ohms, replace instrument cluster printed circuit.
- Measure resistance between fuel gauge terminals GND and UNIT. If resistance is not 126-146 ohms, replace speedometer and fuel gauge assembly. If resistance is 126-146 ohms, replace instrument cluster printed circuit. After repair, go to next step.
- Measure resistance between water temperature gauge terminals IGN and GND. See Fig 2
. If resistance is not 198-218 ohms, go to next step, If resistance is 198-218 ohms, replace instrument cluster printed circuit.
- Measure resistance between water temperature gauge terminals IGN and UNIT. If resistance is not 46-66 ohms, go to next step, If resistance is 46-66 ohms, replace instrument cluster printed circuit.
- Measure resistance between fuel gauge terminals GND and UNIT. If resistance is not 254-274 ohms, replace tachometer and water temperature gauge assembly, If resistance is 254-274 ohms, replace instrument cluster printed circuit. After repair, reassemble and install instrument cluster and check for normal operation.