Fuel Tank: Removal: Removal
- DISCHARGE FUEL SYSTEM PRESSURE
- Discharge the fuel system pressure. Refer to PRECAUTION
.
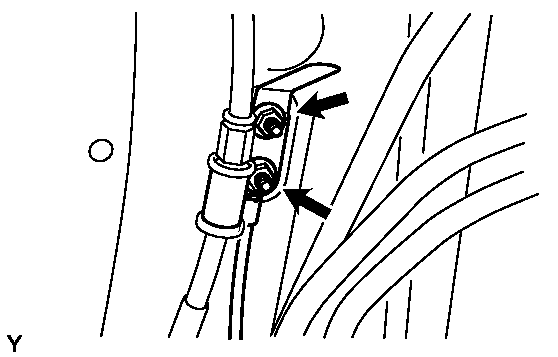
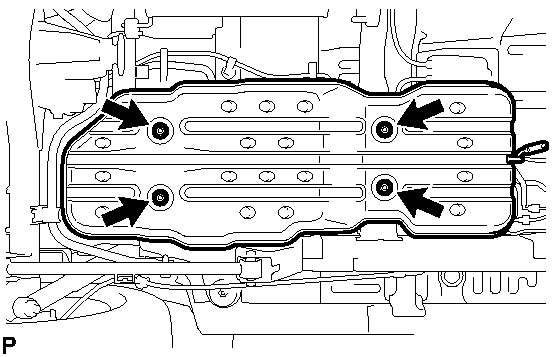
- REMOVE NO. 1 FUEL TANK PROTECTOR SUB-ASSEMBLY (for Automatic Transmission)
- Remove the 2 nuts and the fuel tank protector bracket.
 Courtesy of © TOYOTA, LICENSE AGREEMENT TMS1002
- Remove the 4 nuts and the fuel tank protector.
 Courtesy of © TOYOTA, LICENSE AGREEMENT TMS1002
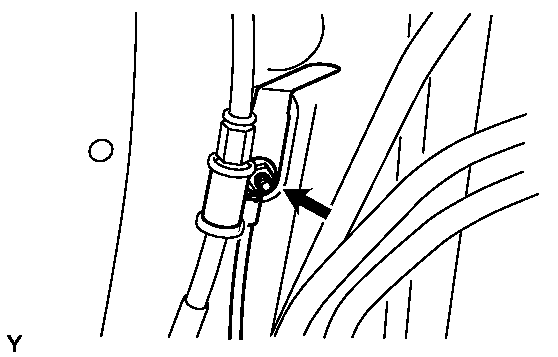
- REMOVE NO. 1 FUEL TANK PROTECTOR SUB-ASSEMBLY (for Manual Transmission)
- Remove the nut and the fuel tank protector bracket.
 Courtesy of © TOYOTA, LICENSE AGREEMENT TMS1002
- Remove the 4 nuts and the fuel tank protector.
Courtesy of © TOYOTA, LICENSE AGREEMENT TMS1002
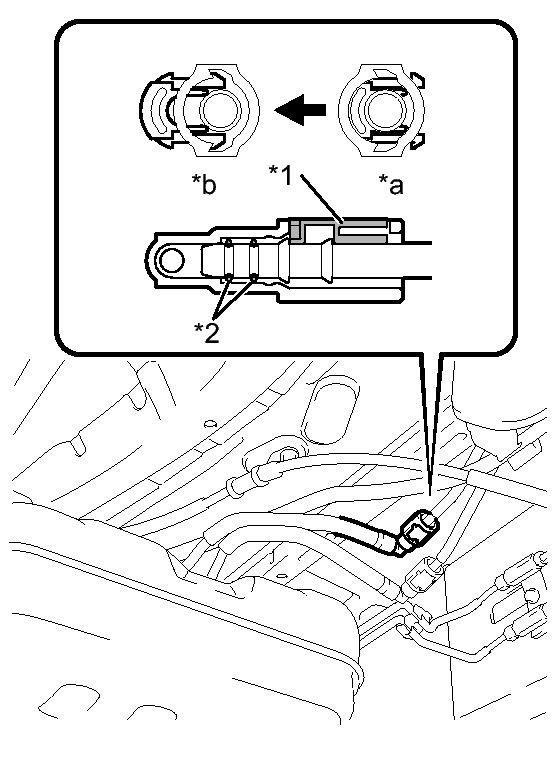
- DISCONNECT FUEL TANK MAIN TUBE SUB-ASSEMBLY
- Pinch the retainer to disengage the lock claws and pull out the fuel tank main tube.
 Courtesy of © TOYOTA, LICENSE AGREEMENT TMS1002
 TEXT IN ILLUSTRATION
| *1 |
Retainer |
| *2 |
O-Ring |
| *a |
Lock |
| *b |
Unlock |
NOTE:
- Check that there is no dirt or mud around the quick connector before performing this work, because the quick connector has an O-ring which seals the pipe and the connector. Clean the connector if necessary.
- Do not use any tools in this work.
- Do not bend or twist the nylon tube.
- To protect the tube, cover it with a vinyl bag after disconnecting it.
- When the connector and the pipe are stuck, turn the retainer carefully to disconnect them.
- DRAIN FUEL
- Operate the fuel pump and drain the fuel from the fuel tank through the fuel tank main tube. Refer to ON-VEHICLE INSPECTION - Step 1
.
- REMOVE FRONT DOOR SCUFF PLATE LH
- Disengage the 14 claws and remove the front door scuff plate.
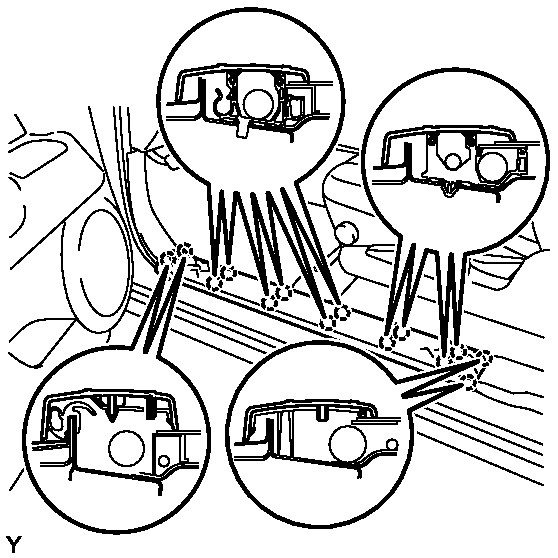 Courtesy of © TOYOTA, LICENSE AGREEMENT TMS1002
- REMOVE REAR DOOR SCUFF PLATE LH
- Disengage the 6 claws and remove the rear door scuff plate.
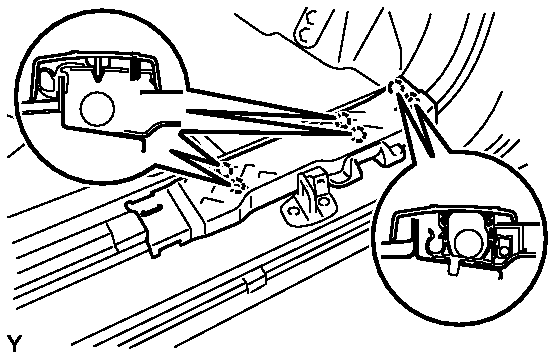 Courtesy of © TOYOTA, LICENSE AGREEMENT TMS1002
- REMOVE REAR SEAT CUSHION ASSEMBLY LH
- Remove the 2 bolts, then remove the rear seat cushion LH.
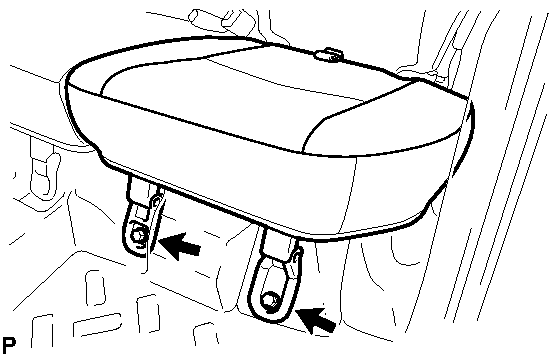 Courtesy of © TOYOTA, LICENSE AGREEMENT TMS1002
- REMOVE REAR FLOOR SERVICE HOLE COVER
- Pull back the floor carpet.
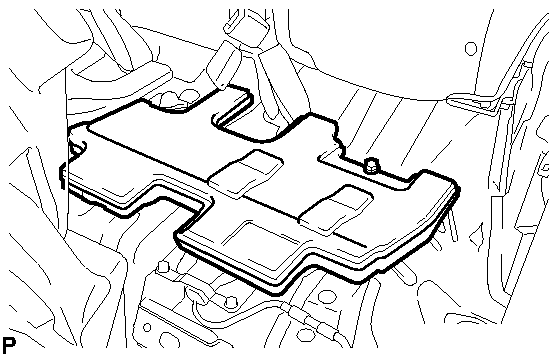 Courtesy of © TOYOTA, LICENSE AGREEMENT TMS1002
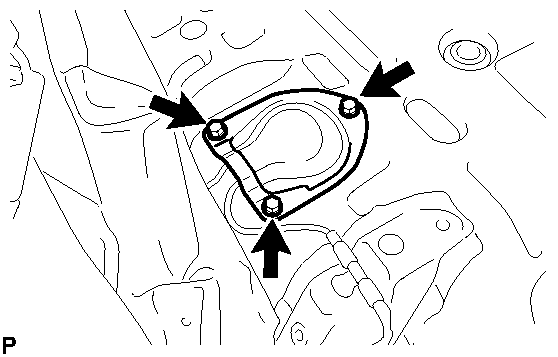
- Remove the center floor silencer pad LH.
- Remove the 3 screws from the center floor.
 Courtesy of © TOYOTA, LICENSE AGREEMENT TMS1002
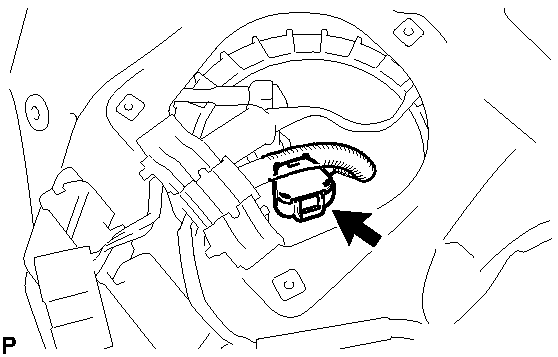
- Disconnect the connector.
 Courtesy of © TOYOTA, LICENSE AGREEMENT TMS1002
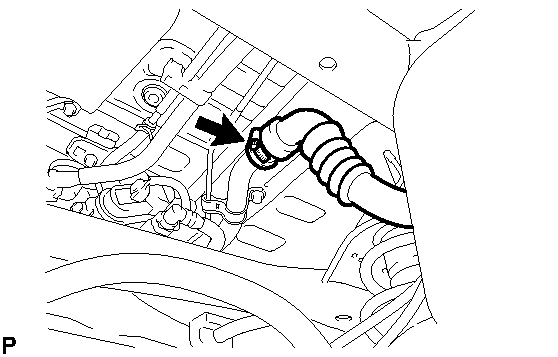
- REMOVE FUEL TANK TO FILLER PIPE HOSE
- Loosen the clamp bolt, and disconnect the fuel tank to filler pipe hose.
 Courtesy of © TOYOTA, LICENSE AGREEMENT TMS1002
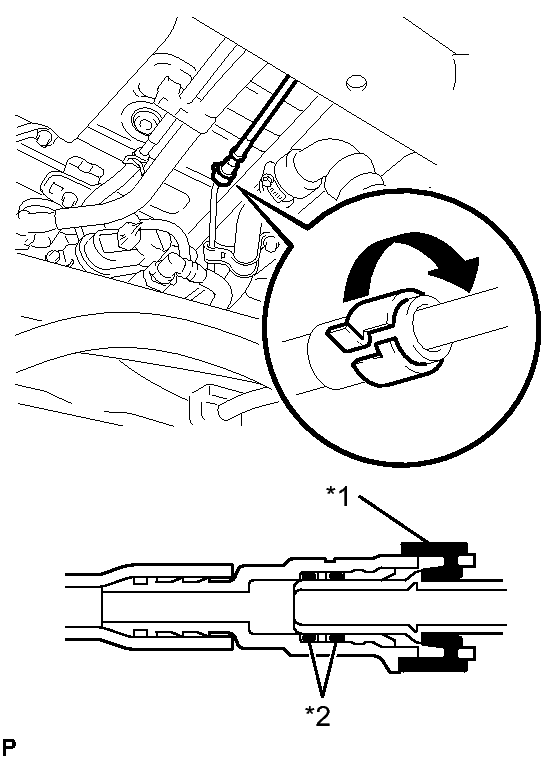
- REMOVE FUEL TANK BREATHER TUBE SUB-ASSEMBLY
- Turn the retainer to disengage the lock claws and pull out the fuel tank breather tube.
 Courtesy of © TOYOTA, LICENSE AGREEMENT TMS1002
 TEXT IN ILLUSTRATION
| *1 |
Retainer |
| *2 |
O-Ring |
 |
Turn |
NOTE:
- Check that there is no dirt or mud around the quick connector before performing this work, because the quick connector has an O-ring which seals the pipe and the connector. Clean the connector if necessary.
- Do not use any tools in this work.
- Do not bend or twist the nylon tube.
- To protect the tube, cover it with a vinyl bag after disconnecting it.
- When the connector and the pipe are stuck, turn the retainer carefully to free and then disconnect the fuel tank tube.
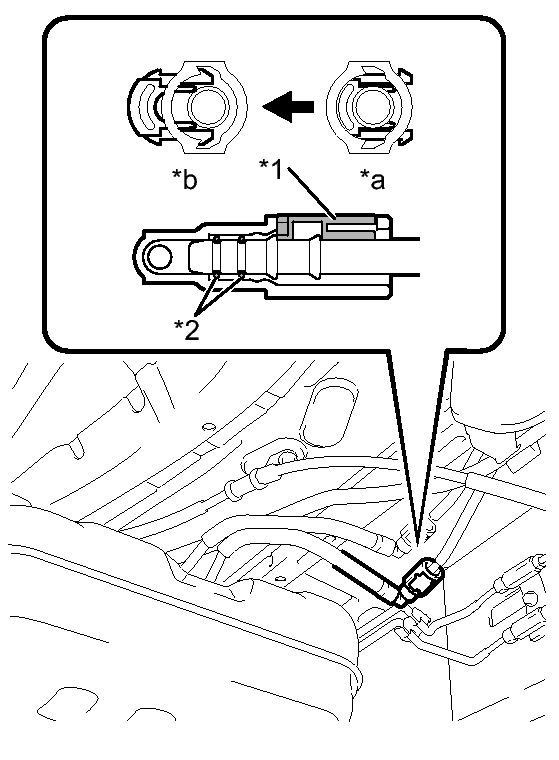
- DISCONNECT FUEL TANK RETURN TUBE
- Pinch the retainer to disengage the lock claws and pull out the fuel tank return tube.
 Courtesy of © TOYOTA, LICENSE AGREEMENT TMS1002
 TEXT IN ILLUSTRATION
| *1 |
Retainer |
| *2 |
O-Ring |
| *a |
Lock |
| *b |
Unlock |
NOTE:
- Check that there is no dirt or mud around the quick connector before performing this work, because the quick connector has an O-ring which seals the pipe and the connector. Clean the connector if necessary.
- Do not use any tools in this work.
- Do not bend or twist the nylon tube.
- To protect the tube, cover it with a vinyl bag after disconnecting it.
- When the connector and the pipe are stuck, turn the retainer carefully to disconnect them.
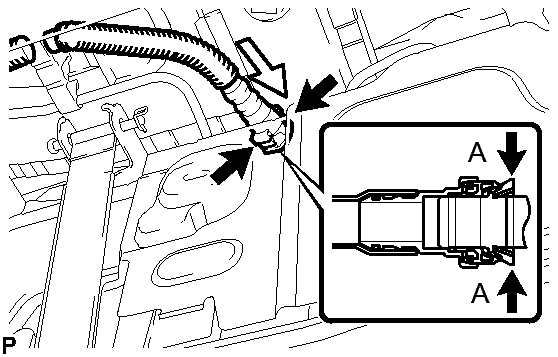
- DISCONNECT FUEL TANK VENT HOSE
- Disconnect the fuel tank breather tube from the fuel tank.
 Courtesy of © TOYOTA, LICENSE AGREEMENT TMS1002
 TEXT IN ILLUSTRATION
|
Pinch |
 |
Push |
- Push the connector deep inside.
- Pinch portion A, as shown in the illustration.
- Pull out the connector.
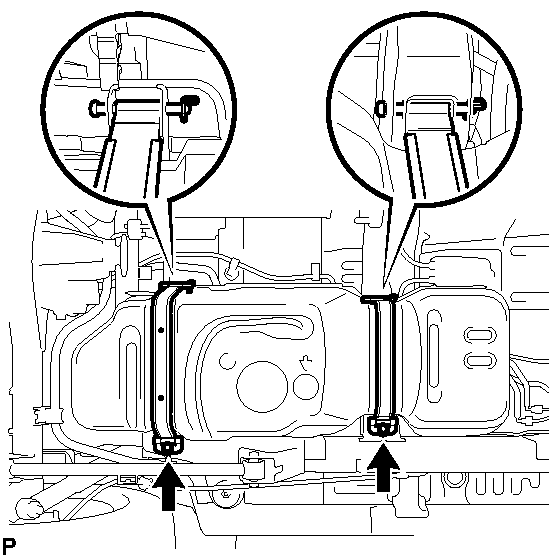
- REMOVE FUEL TANK ASSEMBLY
- Hold the fuel tank using a mission jack.
 Courtesy of © TOYOTA, LICENSE AGREEMENT TMS1002
- Remove the 2 fuel tank bands.
- Remove the 2 bolts.
- Remove the 2 clips and 2 pins, then remove the 2 fuel tank bands.
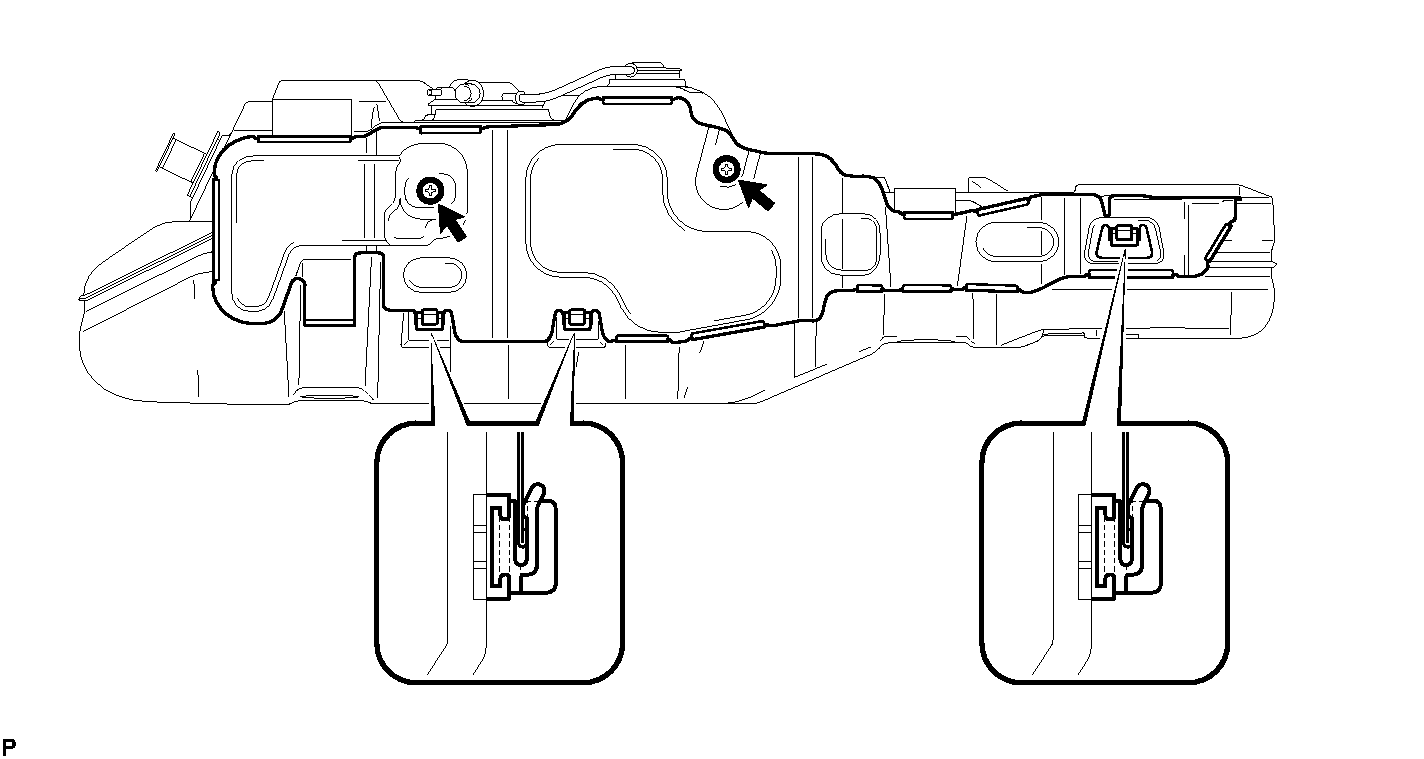
- REMOVE NO. 3 FUEL TANK PROTECTOR
- Remove the 2 bolts and disengage the 3 claws, then remove the No. 3 fuel tank protector.
 Courtesy of © TOYOTA, LICENSE AGREEMENT TMS1002
- REMOVE FUEL TANK CUSHION
- Remove the 4 fuel tank cushions from the fuel tank.
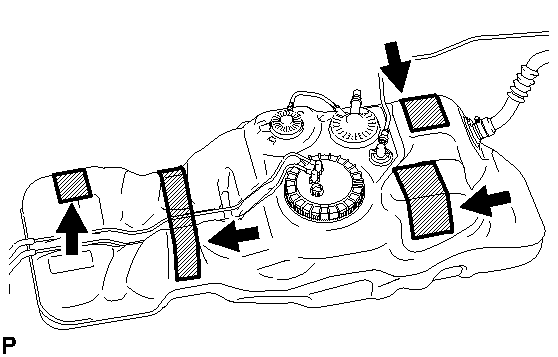 Courtesy of © TOYOTA, LICENSE AGREEMENT TMS1002
- REMOVE FUEL TANK MAIN TUBE AND FUEL TANK RETURN TUBE
- Remove the 2 joint clips, and pull out the 2 fuel tank tubes.
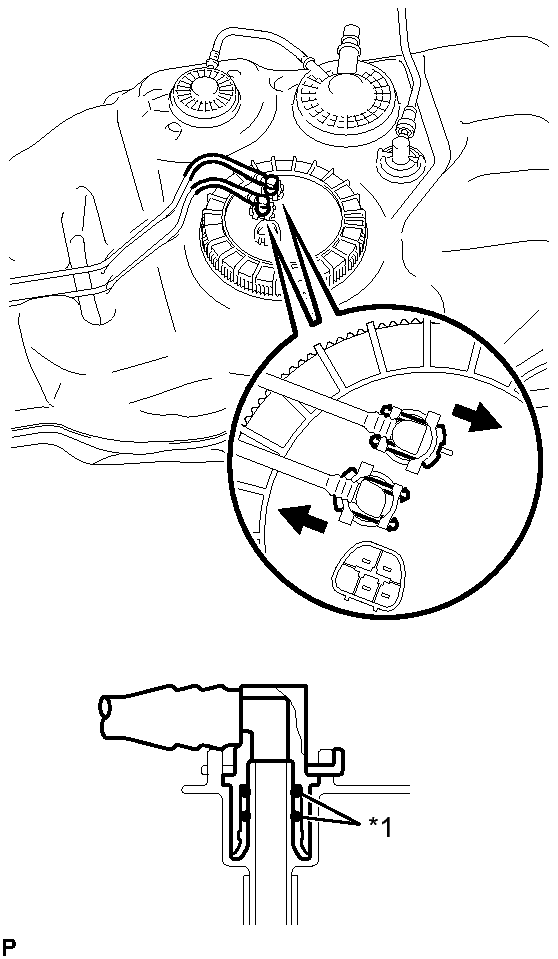 Courtesy of © TOYOTA, LICENSE AGREEMENT TMS1002
 TEXT IN ILLUSTRATION
| *1 |
O-Ring |
|
Pull |
NOTE:
- Check that there is no dirt or mud around the quick connector before performing this work, because the quick connector has an O-ring which seals the pipe and the connector. Clean the connector if necessary.
- Do not use any tools in this work.
- Do not bend or twist the nylon tube by force.
- After disconnecting, cover the fuel tube joint with a vinyl bag.
- When the fuel tube joint and fuel suction plate are stuck, turn the fuel tank main tube carefully to free and then disconnect it. Likewise, disconnect the fuel tank return tube.
- REMOVE FUEL SUCTION WITH PUMP AND GAUGE TUBE ASSEMBLY
See step 2
- REMOVE FUEL TANK BREATHER TUBE SUB-ASSEMBLY
- Pinch the retainer to disengage the lock claws and pull out the fuel tank breather tube.
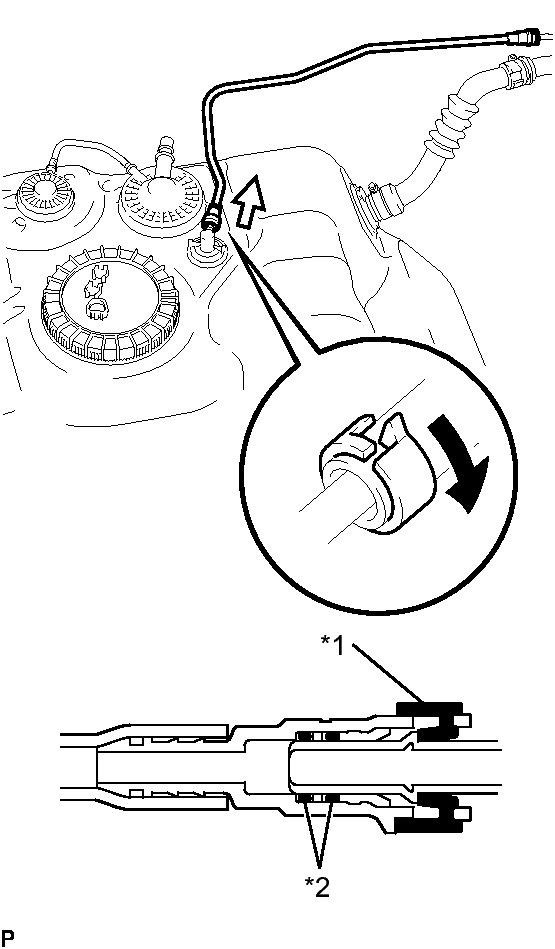 Courtesy of © TOYOTA, LICENSE AGREEMENT TMS1002
 TEXT IN ILLUSTRATION
| *1 |
Retainer |
| *2 |
O-Ring |
|
Turn |
|
Pull |
NOTE:
- Check that there is no dirt or mud around the quick connector before performing this work, because the quick connector has an O-ring which seals the pipe and the connector. Clean the connector if necessary.
- Do not use any tools in this work.
- Do not bend or twist the nylon tube.
- To protect the tube, cover it with a vinyl bag after disconnecting it.
- When the connector and the pipe are stuck, turn the fuel tank breather tube carefully to disconnect them.
- REMOVE FUEL TANK TO FILLER PIPE HOSE
- Loosen the clamp bolt, and disconnect the fuel tank to filler pipe hose.
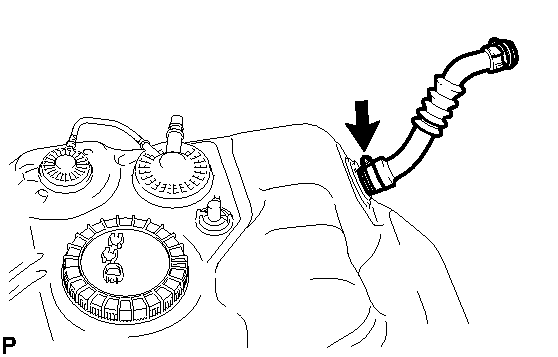 Courtesy of © TOYOTA, LICENSE AGREEMENT TMS1002