Expansion Valve Replacement
- Recover the refrigerant with a recovery/recycling/charging station (see REFRIGERANT RECOVERY
).
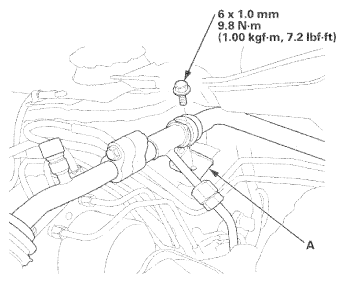
- Remove the bolt from the A/C line clamp (A).
 Courtesy of AMERICAN HONDA MOTOR CO., INC.
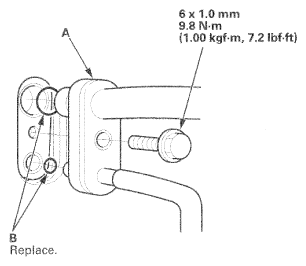
- Remove the bolt, then disconnect the A/C line (A) from the evaporator core, and remove the O-rings (B).
 Courtesy of AMERICAN HONDA MOTOR CO., INC.
- Remove the blower unit (see DUST AND POLLEN FILTER REPLACEMENT
).
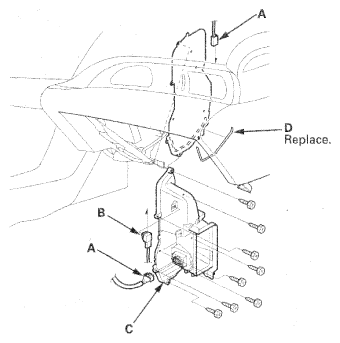
- Disconnect the connectors (A) from the evaporator temperature sensor and the power transistor, then remove the connector clip (B). Remove the self-tapping screws, the expansion valve cover (C), and the seal (D).
 Courtesy of AMERICAN HONDA MOTOR CO., INC.
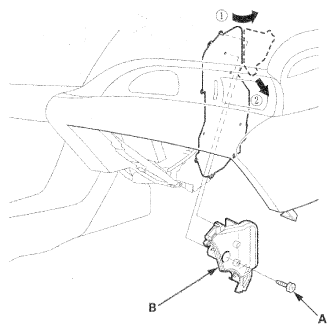
- Remove the self-tapping screw (A), push the upper cover (B) toward the front of the vehicle, then remove the upper cover.
 Courtesy of AMERICAN HONDA MOTOR CO., INC.
- Remove the bolts and the expansion valve (A) and the inlet/outlet lines from the evaporator core assembly without bending the lines.
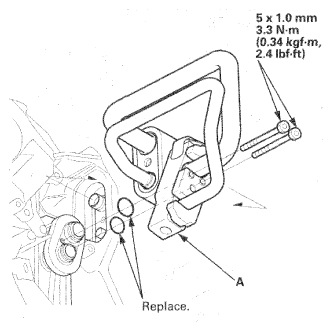 Courtesy of AMERICAN HONDA MOTOR CO., INC.
- Remove the inlet/outlet lines (A) from the expansion valve (B).
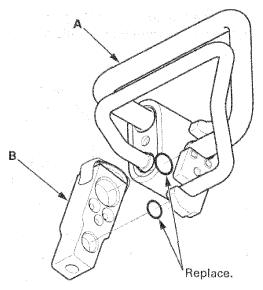 Courtesy of AMERICAN HONDA MOTOR CO., INC.
- Install the expansion valve in the reverse order of removal, and note these items:
- Replace the O-rings with new ones at each fitting, and apply a thin coat of refrigerant oil before installing them. Be sure to use the correct O-rings for HFC-134a (R-134a) to avoid leakage.
- Immediately after using the oil, reinstall the cap on the container, and seal it to avoid moisture absorption.
- Do not spill the refrigerant oil on the vehicle; it may damage the paint; if the refrigerant oil contacts the paint, wash it off immediately.
- Make sure that there is no air leakage.
- Charge the system (see SYSTEM CHARGING
).